Wednesday, May 27, 2009

Outrageous(ly Fattening) Brownies - Barefoot Bloggers

Ina's Outragious(ly fattening) Brownies

Seriously, are you surprised by the amount of fat and sugar in these brownies, it IS Ina. This is the lady that puts half a stick of butter in her burgers. Even though, I think she has outdone herself this time. Let’s see how we can kill a person with one simple dessert:

i) 1 POUND of Butter... go Ina,
ii) 2 POUNDS of Chocolate, ok, I love chocolate, but two pounds?!?
iii) 6 EXTRA LARGE EGGS, ugg, the cholesterol
iv) 2.5 CUPS of Sugar, really, as if the 3 pound of butter and chocolate isn’t enough
v) 3 CUPS of walnuts, lets just keep tacking on the fat, why not?

I'm not saying that these weren’t amazing, because they were, but after a couple of these puppies don’t expect your heart to pump normally ever again. I remember watching her make these on TV a year back and wanting to throw something at the screen because I was sure that just watching that much fat go into one dessert was terribly terribly wrong.

If you want to live on the edge, first book your hospital stay, then make the recipe here. Nice knowing you.

Tuesday, May 26, 2009

Fiddleheads in a Garlic Butter Lemon Sauce

Poached Egg on Asparagus and Fiddleheads

Breakfast for Supper! Well that is the theme of the next supper club we are holding so Ian and I thought we would get into the spirit early and try these poached eggs on asparagus and fiddleheads for supper. That day my Gale Gand "Brunch!" cookbook came in the mail and we couldn't resist all the full page glossy photos of breakfast.

Fiddleheads are in season here right now and I just love them so we added them to the recipe. I hope that they freeze well because they would be great all year round. If you don't know what fiddle heads are, they are basically a type of fern that is picked at a young age. If the fern is straight it is too old to eat, but if it is curled around itself like a fiddle head, they are tender and delicious.

This dish was scrumptious, but I think the star of the show was the light butter, garlic, and lemon sauce that was drizzled over the asparagus and fiddleheads. The next day I made the sauce again for the fiddleheads alone and it was just as stunning. I don't think that I could eat them any other way. I will post the sauce below, try it, you won’t be disappointed!

P.S, the recipe for the Fennel Sausage Pasta has been posted.

Fiddleheads in a Garlic Butter Lemon Sauce
adapted from Gale Gand's "Brunch!"

20-40 Fiddleheads
1 clove garlic, chopped
1 tbsp. Olive Oil
2 tbsp. butter
Juice of 1 lemon
Salt and Pepper

Cut the brown end off of the fiddleheads and let sit in cold water for 3 minutes to clean away any unwanted dirt. Blanche the fiddleheads by bringing salted water to a boil and cook for 4-6 minutes. Drain the fiddleheads and water, and then set aside. In the same pot heat the olive oil and sauté the garlic for 1 minute. Turn off the heat and add butter. When the butter has melted add the lemon juice, salt, and pepper. Drizzle over the fiddleheads and serve.

Thursday, May 21, 2009

Fresh Fennel and Italian Sausage on Casarecce Pasta -- Ian and Christie's Great Fennel Adventure

Fresh Fennell & Italian Sausage on Casarecce pasta, or, Ian and Christies great Fennel adventure

I Hate Fennel. There, I said it. I asked Ian if he liked it but I forgot, if he hasn't eaten a certain food before his answer is always "No". So, in an attempt to expand our culinary horizons we boldly trekked into the vegetable store and bought a bulb of fennel.

We then picked out this great looking fennel sausage pasta from the Pasta et Cetera a la Di Stasio cookbook that looked delicious. It also looked like it would mask the taste of the fennel. I think it was a good starting point.

Ok, that was the easy part, but cutting the fennel was a little tricky. Seasoned fennel lovers out there will think I'm crazy, "how could she not know how to cut fennel, it's so easy" well, if you have never seen it cut before, how do you know what to save for eating, and what to throw out. Plus I hate liquorice so the smell was annoying.

Fresh Fennell & Italian Sausage on Casarecce pasta, or, Ian and Christies great Fennel adventure

To get rid of that bitter liquorice taste we sautéed it with crisp red and green peppers, onions, garlic, and Italian sausage until it was soft and caramelized. Take that fennel! Let me tell you, if fennel always tasted like that Ian and I would be big fans. I don't know if I actually like fennel or if Josée Di Stasio is just brilliant at creating wonderful recipes, but this pasta was a winner. I can't believe I just said that.

If you would like the recipe I would be more than happy to post it but I urge you to take out this book from the library, or buy it, or even borrow the book from a friend. Every recipe looks and tastes amazing! I just bought her other book A la Di Stasio because I took it out from the library three months in a row and didn't want to bring it back. Another great pasta recipe that we make every week (seriously) by Josée Di Stasio that is very similar is the Sausage and Spinach Shells.

Ok, by popular demand, here is my version of the recipe, but still go out and get the book!

Fresh Fennel and Italian Sausage on Pasta
adapted from "Pasta et Cetera" by Josee Di Stasio

500g, about 3 Italian Sausages (good quality, go to your butcher!)
1/2 to a full bulb of fennel (depending on if you like fennel), cut into strips
1 of each red and orange pepper, total two peppers, cut into strips
1 clove of garlic, chopped
1 tsp. fennel seeds
500g dried pasta
3/4 cup low sodium chicken stock
1/4 cup pasta water
1/3 cup freshly grated Parmesan cheese
Salt and Pepper

In a large pan remove skin from the sausage and sauté until no more pink can be seen. Remove the sausage but leave the fat from them in the pan. Sauté the fennel and peppers in the fat for 10 minutes or until the fennel becomes soft and caramelized. Add the garlic, fennel seeds, salt, and pepper and cook for 2 minutes. In a large pot boil salted water and cook pasta until al dente. During that time add the sausage back to the pan with the fennel and add the chicken stock. Cook until 2/3rds of the chicken stock is gone. When the pasta is done take the ¼ cup of pasta water and add it to the sausage and fennel mix. Add the grated Parmesan cheese and the drained pasta. Mix together and serve.

Tuesday, May 19, 2009

Olive Oil and Balsamic Strawberry Cupcakes with a Herbed Mascarpone Cream -Iron Cupcake Earth: Savoury

Savory Cupcakes

So here it is, this month's addition to Iron Cupcake Earth: Savoury Cupcakes! And no, Savoury isn't spelled wrong, for some reason certain words are spelled differently in Canada like 'flavour', 'savour', 'favourite', and 'colour'. Anyways, I am the last person that should be telling anyone how to spell so I will just say that Ian and I are both still amazed that this little blog won the last Iron Cupcake Challenge, and thanks to all of you who voted!

I was a little afraid to make savoury cupcakes after seeing one entry that was a meatloaf cupcake with mashed potato topping. Could I live up to that? Did I want to live up to that? That cupcake will get my vote for sure!

The other night Ian took me out for dinner at this chic little restaurant down the street where I had a delightful appetizer. It was a strawberry and bocconcini caprese salad tossed in fresh basil pesto and aged balsamic vinegar, then topped with a light and fluffy herbed whipped cream. Yum, it was so different, yet so delightful I had to recreate it in a cupcake.

Savory Cupcakes

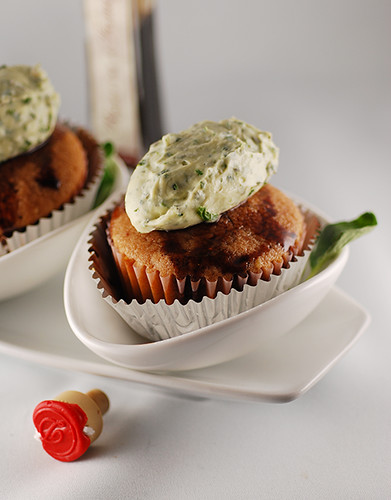
The cupcakes are made with a strawberry and aged balsamic vinegar syrup mixed into a vanilla cupcake batter. I substituted half of the butter for a deliciously fruity Extra Virgin Olive Oil that gave a great savoury taste to the whole cupcake. Once they cooled I drizzled some thick aged Balsamic over top.

I obviously was not going to add bocconcini to the cupcake so I used thick Mascarpone Cheese and blended it with some whipped cream to create a lighter texture. Then I minced up some basil and oregano to make a wonderful herb infused topping for the cupcake.

So that is the story behind these savoury cupcakes. But, if you know anything about Ian, you know that he is allergic to those lovely strawberries so I switched out the syrup for some lemon zest and watched him stuff one after another of the lemon olive oil cupcakes into his mouth. I guess they were a hit no matter what the flavour!

Voting should be open on Saturday, May 30 at 8 p.m. at NO ONE PUTS CUPCAKE IN A CORNER, and will be open through Friday, June 5 at 12 noon. I don't really think that we can win anything again, nor would it be fair, so go and check out all the other entries and vote for your favourites!

Savory Cupcakes

And now for the sponsors:
A sweet cupcake ID bracelet by INSANEJELLYFISH, something sweet and dangly from CHERRYCREEKCHARMS .
a sweet surprise from Sweet Cuppin' Cakes Cupcakery,
PLUS, IronCupcake:Earth can not forget our good friend, CAKESPY, who is now going to be doing a piece for our winner each month until further notice - sweet!
Last and certainly not least, don’t forget our corporate prize providers: HEAD CHEFS by FIESTA PRODUCTS, HELLO CUPCAKE by Karen Tack and Alan Richardson, JESSIE STEELE APRONS ; TASTE OF HOME books; a t-shirt from UPWITHCUPCAKES.COM . Iron Cupcake:Earth is sponsored in part by 1-800-Flowers

Olive Oil and Balsamic Strawberry Cupcakes with a Herbed Mascarpone Cream

Strawberry Balsamic Syrup
adapted from A Good Appetite Blog
1 cup strawberries, fresh or frozen (frozen worked really well)
1/4 cup sugar
2 tbsp. balsamic vinegar

Olive Oil and Balsamic Strawberry Cupcakes
1/4 cup unsalted butter, softened
1/4 cup fruity Extra Virgin Olive Oil
3/4 cups sugar
2 large eggs, at room temperature
1 1/3 cups all-purpose flour
1/2 cup milk
1-1/4 teaspoons baking powder
1/2 teaspoon vanilla
1/4 teaspoon salt
Strawberry balsamic syrup
aged balsamic vinegar for drizzling on top

Herbed Mascarpone Cream
2 tbsp. fresh oregano minced
4 tbsp. fresh basil minced
1/3 cup mascarpone cheese
1/4 cup whipped cream, no sugar added

Strawberry Balsamic Syrup
If using fresh strawberries cut them in half & remove the stems. If using frozen thaw them. Mix the strawberries with sugar & let stand for about 15 minutes. Place in a small saucepan & add balsamic. Let simmer over medium for about 15 minutes. The strawberries should create a syrup. After 15 minutes of cooking puree until you have a uniform syrup.

Olive Oil and Balsamic Strawberry Cupcakes
Preheat oven to 350°. In a large bowl, cream the butter, olive oil and sugar until smooth and fluffy, about 3 minutes. Add the eggs one at a time, beating well after each addition. Combine the flour, salt, and baking powder then add in four parts, alternating with the milk, strawberry balsamic syrup and the vanilla extract, beating well after each addition. Line two 12-cup muffin tins with cupcake papers. Spoon the batter into the cups about three-quarters full. Bake until the tops spring back when lightly touched, about 20 to 22 minutes. Once cooled, drizzle with aged balsamic vinegar.

Herbed Mascarpone Cream
Gently mix together the whipped cream and mascarpone until smooth. Add in the minced herbs.

Thursday, May 14, 2009

Ricotta Gnocchi with Lemon and Sage Buerre Sauce - Daring Cooks

Ricotta Gnocchi

So here it is guys, the first ever Daring Cooks Challenge! This one was exciting because I was finally pushed to make fresh ricotta. And you know what; it was one of the easiest and fastest foods I have ever made. I poo poo on those $6.95 tubs of glue like cheese now. Seriously, all you need is a 2L carton of whole milk, a 1 cup carton of cream, 1 lemon, a splash of vinegar, and a pinch of salt. Presto, in five minutes you have ricotta.

Ricotta Gnocchi

The gnocchi on the other hand was long and intensive. As you can tell the main ingredient is ricotta and these are not the normal potato gnocchi that we all love. These little buggers are each hand rolled with (decreasing) love; each dipped individually in flour, and cooked in small batches.

Even though the gnocchi took a day to make, the taste was sensational and we ate them all in one sitting. They were so soft and fluffy, and every time you bit into one it would burst delicious ricotta into your mouth. I have never had anything like these and I would encourage everyone to try ricotta gnocchi at least once in your life. Just don't ask me to roll them; you’re out of luck there.

Ricotta Gnocchi


Zuni Ricotta Gnocchi
adapted from The Zuni Café Cookbook.
Makes 40 to 48 gnocchi (serves 4 to 6)
Prep time: Step 1 will take 24 hours. Steps 2 through 4 will take approximately 1 hour.(lies)

For the ricotta:
2L whole milk
1 cup cream
1/2 teaspoon salt
2 tbsp fresh lemon juice
1-1/2 tbsp. vinegar

For the gnocchi:
1 pound fresh ricotta (2 cups)
2 large cold eggs, lightly beaten
1 tablespoon (1/2 ounce) unsalted butter
2 or 3 fresh sage leaves, or a few pinches of freshly grated nutmeg
½ ounce Parmigiano-Reggiano, grated (about ¼ cup very lightly packed)
about ¼ teaspoon salt (a little more if using kosher salt)
all-purpose flour for forming the gnocchi

For the gnocchi sauce:
6 tbsp butter, sliced
2 tbsp olive oil
Zest of 1 lemon
10 Sage leaves, chopped
Salt, pepper

Tips:
- If you can find it, use fresh ricotta. As Judy Rodgers advises in her recipe, there is no substitute for fresh ricotta. It may be a bit more expensive, but it's worth it.
- Do not skip the draining step. Even if the fresh ricotta doesn't look very wet, it is. Draining the ricotta will help your gnocchi tremendously.
- When shaping your gnocchi, resist the urge to over handle them. It's okay if they look a bit wrinkled or if they're not perfectly smooth.

Step 1: Making and Preparing the ricotta

Line a large sieve with a layer of heavy-duty (fine-mesh) cheesecloth and place it over a large bowl. Slowly bring milk, cream, and salt to a boil in a pot over medium heat, stirring occasionally to prevent scorching. Add lemon juice and vinegar, then reduce heat to low and simmer, stirring once half way through, until the mixture curdles, about 2-4 minutes.Pour the mixture into the lined sieve and let it drain for 1 hour. After discarding the liquid, chill the ricotta, covered; it will keep in the refrigerator 2 days.

If the ricotta is too wet, your gnocchi will not form properly. To remove some of the moisture, line a sieve with cheesecloth or paper towels and place the ricotta in the sieve. Cover it and let it drain for at least 8 hours and up to 24 hours in the refrigerator. It’s recommended that you do this step the day before you plan on making the gnocchi.

Step 2: Making the gnocchi dough.


To make great gnocchi, the ricotta has to be fairly smooth. Place the drained ricotta in a large bowl and mash it as best as you can with a rubber spatula or a large spoon (it’s best to use a utensil with some flexibility here). As you mash the ricotta, if you noticed that you can still see curds, then press the ricotta through a strainer to smooth it out as much as possible.

Add the lightly beaten eggs to the mashed ricotta. Melt the tablespoon of butter. As it melts, add in the sage and nutmeg. Then add it all to the ricotta mixture. Add the Parmigiano-Reggiano and the salt. Beat all the ingredients together very well. You should end up with a soft and fluffy batter with no streaks (everything should be mixed in very well).

Step 3: Forming the gnocchi

In a large, shallow baking dish or on a sheet pan, make a bed of all-purpose flour that’s ½ an inch deep.With a spatula, scrape the ricotta mixture away from the sides of the bowl and form a large mass in the centre of your bowl.Scoop up about 1 teaspoon of batter and then gently roll into a log and toss into the bed of flour. Use your fingers to very gently dust the gnocchi with flour. Gently pick up the gnocchi and cradle it in your hand rolling it to form it in an oval as best as you can, at no point should you squeeze it.

Step 4: Cooking the gnocchi.

Have a large skillet ready to go. Melt the butter and oil for the sauce in the skillet and set aside. In the largest pan or pot that you have, bring at least 2 quarts of water to a boil. You need a wide pot or pan so that your gnocchi won’t bump into each other and damage each other. Once the water is boiling, salt it generously.Drop the gnocchi into the water one by one. They will sink and then bob to the top. From the time that it bobs to the surface, you want to cook the gnocchi until it’s just firm. This could take 3 to 5 minutes.If your gnocchi begins to fall apart, this means that the ricotta cheese was probably still too wet. You can remedy this by beating a teaspoon of egg white into your gnocchi batter. If your gnocchi batter was fluffy but the sample comes out heavy, add a teaspoon of beaten egg to the batter and beat that in.
When the gnocchi float to the top, you can start your sauce while you wait for them to finish cooking. Place the skillet over the heat again. Add the lemon zest, sage, salt and pepper. With a slotted spoon, remove the gnocchi from the boiling water and gently drop into the butter sauce. Carefully roll in the sauce until coated. Serve immediately.

Tuesday, May 12, 2009

Pita Chips


Where oh where is my boyfriend... have you seen him? The hockey rink you say? But it's not hockey season.

Yes, that's true, it is Canada and hockey season never really ends, but Tuesday night? Didn't his team just play on Saturday... and watch hockey on TV every other night?

Ok, yes I did know what I was getting into when I started dating a Montreal Canadiens fan... but I need a picture taken. No luck you say eh. Humm.

Oh well, I guess we will all just have to take back seat to hockey once again, I'm just honoured to be equal in his mind to his love of hockey.

So today there are no Pita Chip pictures, but I can tell you that these are the perfect party snack. I served them at the latest Supper Club thinking that they would be a small addition to the massive platter I had made, but for some reason they got most of the attention.

I think the key is to use good sea salt. My ‘go to’ salt is Gris Sel du Mer de l'ile de Ré that has been harvested from the clay bottoms of the French Atlantic salt marshes. Grey Sea Salt retains calcium, potassium, magnesium, copper, iron, and iodine for good nutrition. Neither treated nor washed, it’s totally natural and has a great sea water taste. It is also pretty cheap so don't worry, but it makes even plain pasta taste incredible when cooked in a pot of grey salted water.

Anyways, they are super simple and you will never buy those processed fried tortilla chips again. I promise. So, have you seen my boyfriend yet?

Simple Pita Chips

5 Pita's
4 tbsp. (aprox) Extra Virgin Olive Oil
5 tbsp. Italian Spices
5 tbsp. Grey sea salt
2 tbsp. garlic salt (optional)

Cut around the pita's edge and separate the two sides. Cut each side with scissors in to different shapes. Brush with olive oil on the inside of the pita shape. Sprinkle with Italian spices, garlic if using, and sea salt. Repeat for all of the pitas. Bake in a 350 degree oven for 6-8 minutes, or until the chips turn brown around the edges.

Wednesday, May 6, 2009

Chocolate Dipped Cherry Almond Biscotti for Mother's Day

Biscotti
So if you didn’t know, this Sunday is Mother's Day and I thought that I would send out a little reminder to everyone to buy or bake something for your mommy.

I love my mom, and even though we live in different Provinces, I call her all the time and talk to her for hours. She is always there for me, no matter what is going on. Seriously, there are a million things I could tell you about her but she doesn’t like all that sappy stuff so I will just say that she is THE BEST!

I wanted to send something special for Mother's Day and usually I would send a drawing, but this year she is getting the most amazing biscotti that I have ever tried. You know those delicious chocolate cherry Kashi bars that are incredibly addictive? Well imagine those in cookie form. Yes. So good. I have to send them in the mail tomorrow so look out for Canada Post on Friday mom. Hopefully the mailman won’t eat them before they get delivered.

So Happy Mother's Day, I Love you Mom!
Ian also loves his mommy and we will be having dinner with her on Saturday, where he can tell her in person.
Biscotti

Chocolate Dipped Cherry Almond Biscotti
adapted from Martha Stewart's Cookies Book


1 1/4 cup dried cherries
1/2 cup amaretto
3 cups all purpose flour
2 tsp. Baking powder
1/2 tsp. Salt
4 tbsp. Unsalted butter
1 cup sugar
4 large eggs, (3 whole, and 1 lightly beaten)
2 tsp. vanilla extract
3/4 cup whole blanched almonds
4 oz. good quality chocolate, chopped

Preheat oven to 325 degrees. Heat cherries with amaretto in a saucepan over medium-low heat,stirring some, for 8 minutes. Drain, and keep 2 tbsp. liquid.Sift together the flour, baking powder, and salt. Whisk butter and granulated sugar together. Mix in 3 eggs then mix in cherry liquid and vanilla. Gradually add in flour mixture. Stir in cherries and nuts. On a lightly floured surface, divide dough in half. Shape each half into 12 x 2 or so logs. Flatten logs to 1/2 inch thick. Transfer to two baking sheets lined with parchment paper. Brush logs with the beaten egg; sprinkle with sugar if desired. Bake 35 minutes and let cook for 20 minutes. Cut each log on the diagonal into about 3/4 inch slices. Transfer pieces to baking sheet, standing them up. Bake at 300 degrees, for 14 min. Let cool until crisp. Dip into melted, tempered chocolate and let dry overnight at room temperature.

Tuesday, May 5, 2009

Photo Tuesday

Christie

Can I say yayyyy? Well yes I can, so yay! Christie and I won the Ironcupcake challenge for April, and we couldn't be happier. Except of course if I had found out 1 1/2hrs after I had gone to bed, and then woken up 1 1/2hrs before I was set to wake up... sigh. It was a long day. I've missed a few Photo Tuesdays, and I was pretty sad about it, so even though I am in need of sleep badly, I just could not let another week go by without doing one of these. So yaaaarrrr, here she be (said in a pirate tone). Christie seems to hate almost all photos of herself, so I took one and told her I was just "testing" something out, and "jazzed" it up a bit. It's been awhile anyways that there has been any picture of Christie up on the blog, so why not right now. By the way, if it weren't so late already, and I weren't so tired, I was going to post a second version of this photo with Antlers coming out of Christie's head just for the fun of it, but I will get to that later this week :D

**EDIT**

Ok, it was done in about 5 minutes, and badly since I'm so tired, but once I posted the picture I realized that a photo of Christie with antlers on the blog made by me may be a bad idea on my part. Lets just say I learned my lesson before I paid the consequences. hahaha

!!!!WE WON THANKS TO ALL OF YOU!!!!


No seriously, if you don't believe me check it out at 'No One Puts Cupcake in a Corner' who is the wonderful host of Iron Cupcake Earth. All the votes were put into a randomizer and one of our 65 votes was picked! AMAZING, this stuff never happens to me. Now I guess we have used up all our luck and won't be winning that trip to the Bahamas any time soon eh! I think I want the cupcake paraphernalia more than a trip actually!

Thank you all. Thank you thank you thank you.

Friday, May 1, 2009

White Wine and Cream Steamed Mussels

Mussels
Don’t these look amazing, well they taste amazing and are extremely simple to make.

I want to start off by saying that these are my favourite mussels and even though I order them in restaurants any chance I get, nothing tastes as good as these. Plus, if you have ever read Kitchen Confidential by Anthony Bourdain, as I am now, you will know that mussels in a restaurant are not always kept in the most sanitary of conditions.

On that note, it turns out that mussels in an un-named fish store near my apartment are not being kept in the most sanitary of conditions either. Yesterday I wanted mussels, and seeing as I have hardly cooked anything in close to a month thanks to school, I was hoping for a nice quiet night. Me, Ian, some CSI, and a plate of mussels for two was all I was really asking for. Thanks to the store downstairs this did NOT happen.
Mussels
I started the wine and cream sauce and wonderful smells wafted through the apartment. Then, I added the mussels and to everyone’s surprise the place filled with the most horrid stench you could ever imagine. Pardon my French, I promise I have never and will never swear on this blog again, but the smell was an exact match to someone taking a S*!T in the pot. It was so bad my roommate locked his door and didn't come out for five hours. We threw it straight into a garbage bag and I walked down the street to get sushi instead. The worst part was that my stove top fan pumps all the air out onto the street and Ian and I could smell that horrible 'merde' a block and a half away. If you were on Monkland yesterday... I am truly truly sorry, it was not me.

I have made these mussels a million times before, doubled, even tripled this recipe, and have never come across bad mussels. Usually I buy them from the grocery store, not the fish store, and so today, refusing to give in to defeat, I went back to the good old grocery store and bought the mussels flown in from PEI for 3.99/2 pounds.
Mussels
They came out FANTASTIC! Just as they always do. I don’t want to turn anyone off of making their own mussels because they are so easy and never really give you problems. On the contrary, I wanted to post these because it is one of my favourite all time recipes, that’s why I went at it again today, just to prove that yesterday’s batch was a fluke, a one time problem.

I guess the moral of the story is that you should always buy any type of perishable from a place that you know has a large turnover and everything will turn out great.
(Sorry again for the swearing)


White Wine and Cream Steamed Mussels
adapted from Jen's Step-Mom's Recipe

2 pounds of mussels (1 bag)
1 tbsp. butter
1 cup 10% cream
2/3 cup dry white wine
2 tbsp. vermouth
1 tomato
1 package white button mushrooms, sliced
½ an onion, chopped
2 cloves of garlic, minced
3 tbsp. chives, chopped
1 tsp. salt
1 tsp. pepper

Place mussels in cold water and discard any that will not close when you knock the shell on the counter a couple times. Melt butter over medium to high heat in a large stock pot. Cook onions and garlic for 2 min., then add mushrooms and cook until browned, about 8 minutes. Deglaze with wine and vermouth for 3 minutes, and then add the salt, pepper and cream. Bring to a light boil, strain the mussels and add them to the simmering ingredients. Cook uncovered for 5-8 minutes, or when all have opened up. Add the chives to the mussels and discard any mussels that do not open during cooking.