Saturday, June 27, 2009

Cherry and Homemade Nutella Bakewell Hazelnut Tart -- Daring Bakers

Cherry and Homemade Nutella Bakewell Hazelnut Tart -- Daring Bakers

Let me just start off by saying that I have now made and eaten the whole Frangipane tart, but I still for the life of me have no clue what it is nor could I explain it to others. That being said, I LOVE FRANGIPANE. It’s so light and fluffy, very similar to a nutty sponge cake crown. This months DB was challenging because I really had nothing to base it on. Frangipane is not a word that we throw around often here in Canada, wait, scratch that, we NEVER throw it around. That doesn’t mean that I was going to sit this challenge out, it’s "Daring" Bakers, not “Wussy” bakers.

So to start off I made some homemade nutella. Yes, you read that right, you can easily produce nutella in your very own home and it is so very very very delicious (very). Alright, I'm jumping the gun, first came the tart dough. Warning to the wise, do not make short dough with cold butter on a 30 degree day. It’s a bad and oily idea.

Cherry and Homemade Nutella Bakewell Hazelnut Tart -- Daring Bakers

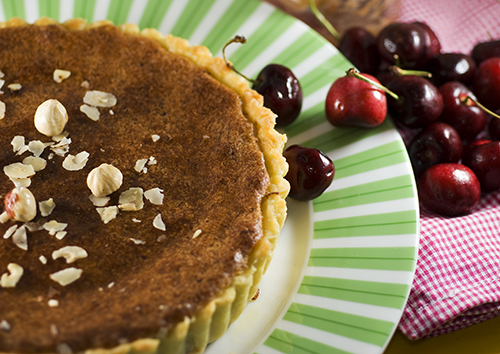
So after that mess of a tart shell was pressed into its mold and cooled forever, in went a thick layer of homemade Nutella and a second substantial layer of Bonne Maman's Cherry Jam. Finally it was time to top the tart with Hazelnut Frangipane. I switched the ground almonds for hazelnuts to complement the nutella and once the final product was out of the oven and cooled, was I ever glad that I did!

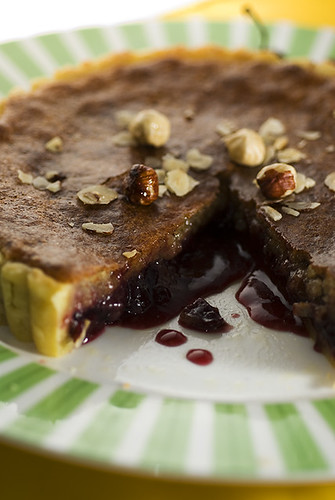
From the cherry jam and nutella, to the frangipane, everything came together to create a very gourmet tasting tart. I’m pretty sure that I filled my tart too full because it leaked everywhere when I cut into it, but really who cares, the flavours were sensational. Thanks DB's.

The June Daring Bakers' challenge was hosted by Jasmine of Confessions of a Cardamom Addict and Annemarie of Ambrosia and Nectar. They chose a Traditional (UK) Bakewell Tart... er... pudding that was inspired by a rich baking history dating back to the 1800's in England.

Note: I will post the nutella recipe in the next few days!

Cherry and Homemade Nutella Bakewell Hazlnut Tart
adapted from Daring Bakers June 2009 Challenge

Sweet Shortcrust Pastry
1 cup all purpose flour
2 tbsp. sugar
1/2 tsp salt
1/2 cup unsalted butter, frozen
2 egg yolks
1/2 tsp. vanilla extract
1-2 tbsp. cold water

Filling
1/2 cup nutella
1/2 cup Bonne Maman Chery Jam

Frangipane
125g (4.5oz) unsalted butter, softened
125g (4.5oz) icing sugar
3 eggs
1/2 tsp almond extract (optional)
125g (4.5oz) ground hazelnuts
2 tbsp. all purpose flour

Sweet Shortcrust Pastry
Sift together flour, sugar and salt. Grate butter into the flour mixture, using the large hole-side of a box grater. Using your finger tips only, and working very quickly, rub the fat into the flour until the mixture resembles bread crumbs. Set aside.Lightly beat the egg yolks with the almond extract (if using) and quickly mix into the flour mixture. Keep mixing while dribbling in the water, only adding enough to form a cohesive and slightly sticky dough. Form the dough into a disc, wrap in cling and refrigerate for at least 30 minutes.

Frangipane
Cream butter and sugar together for about a minute or until the mixture is primrose in colour and very fluffy. Scrape down the side of the bowl and add the eggs, one at a time, beating well after each addition. The batter may appear to curdle. In the words of Douglas Adams: Don’t panic. Really. It’ll be fine. After all three are in, pour in the almond extract and mix for about another 30 seconds and scrape down the sides again. With the beaters on, spoon in the ground nuts and the flour. Mix well. The mixture will be soft, keep its slightly curdled look (mostly from the almonds) and retain its pallid yellow colour.

Assembling the tart
Place the chilled dough disc on a lightly floured surface. Flour the rolling pin and roll the pastry to 5mm (1/4”) thickness, by rolling in one direction only (start from the centre and roll away from you), and turning the disc a quarter turn after each roll. When the pastry is to the desired size and thickness, transfer it to the tart pan, press in and trim the excess dough. Patch any holes, fissures or tears with trimmed bits. Chill in the freezer for 15 minutes.Preheat oven to 200C/400F. Remove shell from freezer, spread as even a layer as you can of nutella, then cherry jam onto the pastry base. Top with frangipane, spreading to cover the entire surface of the tart. Smooth the top and pop into the oven for 30 minutes. Five minutes before the tart is done, the top will be puffy and brownish. Remove from oven and strew flaked hazelnuts on top and return to the heat for the last five minutes of baking.The finished tart will have a golden crust and the frangipane will be tanned, puffy and a bit spongy-looking. Remove from the oven and cool on the counter. When you slice into the tart, the almond paste will be firm, but slightly squidgy and the crust should be crisp but not tough.

Thursday, June 25, 2009

Gazpacho

Gazpacho

Phew is it hot out there! I know that I shouldn't be complaining considering where we are situated in the world, but I was extremely thankful that this week's BB recipe picked by Meryl was Ina's crisp and cool Gazpacho.

Yesterday afternoon Ian and I walked around the area, him in surfer shorts, and me in another summer dress. All the yards right now have these stunningly bright and brilliant flowers in the most vivid pinks, blues, purples, whites, and yellows. Although the flowers were beautiful, our reason for being out there was more than just flower gazing. Ian was teaching me (yes me!) how to use his old Nikon D40. Most people don't know this about me but even though I have been through four years of a BFA in Painting and Drawing, I can't take a good picture to save my life. So it was very nice of him to give me a short lesson and teach me the basics of his old "baby".

Gazpacho

After my lesson and running a few errands I quickly whipped up this fast and incredible gazpacho so that everyone could cool down. It was so flavourful and refreshing, especially served beside a rustic style roast beef sandwich. Of course I made a couple changes such as lowering the olive oil to a tablespoon, adding Mexican hot sauce to spice it up a bit, incorporating a couple of squeezes from some key limes, switching the onion for a milder tasting leek, and changing up the white wine vinegar for some pure Quebec Apple cider vinegar.

If you are looking for a quick dinner to cool you down this summer, look no further, you won't be disappointed. Plus you won't have to eat your vegetables for a week!


Gazpacho
this is my version of Ina's Gazpacho

3/4ths of an English cucumber
2 red bell peppers, cored and seeded
4 Italian tomatoes
1 leek
2 garlic cloves, minced
3 cups Motts Garden Cocktail Tomato juice
1/4 cup Apple cider vinegar
1 tbsp. cup good olive oil
1/2 tbsp. kosher salt
1 tsp. freshly ground black pepper
1-1/2 tbsp. lime juice
2 tbsp hot sauce, or Franks Red Hot

Roughly chop the cucumbers, bell peppers, tomatoes, and leeks into 1-inch cubes. Put each vegetable separately into a food processor or blender fitted with a steel blade and pulse until it is coarsely chopped. Do not over process! After each vegetable is processed, combine them in a large bowl and add the garlic, tomato juice, vinegar, olive oil, hot sauce, lime, salt, and pepper. Mix well and chill before serving. The longer gazpacho sits, the more the flavours develop.

Saturday, June 20, 2009

Dimply Plum Cake -- Sundays with Dorie!

Dimply Plum Cake

Right now Ian is sitting in front of me on the floor contorted in strange positions striving to capture the perfect picture for the second ever Sunday with Dorie. If you are a little lost and scratching your head about the day, let me explain.

One of our favourite bloggers Hilary and I have not been accepted yet into TWD after waiting and politely sending e-mails for seven weeks now. We just couldn't wait another week longer and with book in hand, decided to start our own baking club. Ok, so my book hasn't arrived in the mail yet, but I was too excited to start! Plus this week was my turn to pick the recipe and I have had my eye on this bright plum cake for a while. Hilary wrote an incredible open letter in her Sunday with Dorie post last week which pretty much sums it up.

I can't really tell you much about the cake right now except that it smells insatiable and I am having a very hard time not eating it off of Ian’s photo shoot. What I can tell you is that the cake is much lighter than expected...oh wait, he's done shooting... Be right back....

....as I was saying, now that I have tasted more than just the crumbs from the pan, I can tell you that the cake is more like a fluffy and airy version of a pound cake accenting the sweet and sour plums perfectly. A hint of cardamom added to the batter pulls the fruit and cake together. The lighter texture could be due to the fact that I switched the oil for the same amount of no-fat yogurt. Yes, I am on a blogger diet, basically meaning that there is no way around all the baking and eating but I know enough kitchen science to play around with the ingredients/calories.

Since I am still waiting on my cookbook I found the Dimply Plum Cake recipe at Smitten Kitchen, where Dorie Greenspan’s cookbook ”Baking From My Home to Yours” never stays on the bookshelf for too long.

Now go check out Hilary's blog Let Her Bake Cake for some more dimply goodness.

Sunday, June 14, 2009

Pork and Purple Flower Chive Dumplings -- Daring Cooks

Daring Cooks Chive Potstickers

As I am typing this I am sitting on my patio looking out onto a trendy little shopping village in the west end of Montreal called Monkland village. There's an orange mojito at my side and the hammock is set up and ready.

Why am I telling you all this? Well if you don't know already Ian and I live in one of the coldest cities in the world. Minus 30 is pretty normal here so when nice weather hits, every Montrealer rubs their eyes and comes out of hibernation. That means patio season!

When my roommate and I moved into this apartment it was September and patio season was over. We have been waiting desperately through the fall, winter, and spring, staring out the window at an unused shared patio that spans more square feet than our apartment. Lucky for this Montrealer the nice weather is here, so if you want to join me just yell up from the street and I'll greet you with a mojito and the hammock.

Since the weather was so nice yesterday Ian and I decided to take a long walk through the neighbourhood. Actually, he wanted Popsicles and I wanted Ice cream so we devised a plan in which we would both get what we wanted. On our way I remembered that some purple flowered chives were wildly growing on someone’s property (not in their garden, on the side of an ally) and had to have them for the chive dumplings we were making later on.

So here is the scene, Ian on the street, looking out, telling me that he is going to caw like a bird if anyone starts to look suspiciously at us. Then there is me in my pretty green summer dress wildly climbing though tall grass and picking the chives. So if that was your property, I'm really sorry, but in all seriousness, you should have gotten to them first!

The dumplings were delicious, especially after all the hard work of picking the chives! The first ones we steamed with a bamboo basket and I wasn’t really happy with them. Ian on the other hand could not stop eating and proclaimed the dumplings to be his new favourite dish. We froze about 15 uncooked dumplings and cooked them in boiling water today. These were truly quite amazing. I just don’t think that I'm crazy about the whole steaming business, the dough turned out sticky and tough where as when I boiled them the texture was perfect. Lately I have been frequenting this restaurant in China town that makes their own dumplings in front of a big glass window and you can watch them roll out perfect discs of dough then pack them with a succulent pork and chive filling. When we boiled the dumplings they came out almost exactly like the restaurants, making me one happy camper.

As a side note, since Hilary from Let Her Bake Cake and I have not been accepted into TWD after six weeks of waiting and are feed up, we decided that we are going to make the best of it. So go check out the very first Sunday with Dorie at Hilary’s blog! She made Dorie’s incredible Banana Bundt cake that has my mouth watering! Happy Patio Season to everyone!

Thanks to Jen of Use Real Butter for hosting this delicious dumpling cookoff!


Pork and Chive Dumplings from the Daring Cooks

dough:
2 cups (250g) all-purpose flour
1/2 cup (113g) warm water
flour for work surface

pork filling:
adapted from Gourmet Oct.2008
1 pound fatty ground pork
1 tablespoon wine
1/2 teaspoon Asian sesame oil
1 teaspoon Vietnamese chili-garlic sauce (preferably Huy Fong brand)
3 teaspoons finely grated peeled ginger
1 teaspoon rice vinegar (not seasoned)
4teaspoons soy sauce
1 teaspoon kosher salt
Pinch of pepper
6 tablespoons finely chopped cilantro stems
6 tablespoons finely chopped flowering chives, flat Chinese chives, or scallions

dipping sauce:
1/2 cup soy sauce
1/4 cup rice vinegar
a few drops of sesame oil
1 tsp.chili garlic paste
1 tbsp. minced chives

Making the filling:
Combine all filling ingredients (except cilantro stems and chives) in a large bowl, then stir in cilantro stems and chives. Set bowl in a larger bowl of ice to keep chilled while forming dumplings.
Make the dough:
In a large bowl mix flour with 1/4 cup of water and stir until water is absorbed. Continue adding water one teaspoon at a time and mixing thoroughly until dough pulls away from sides of bowl. You want a firm dough that is barely sticky to the touch. Knead the dough about twenty strokes then cover with a damp towel for 15 minutes. Take the dough and form a flattened dome. Cut into strips about 1 1/2 to 2 inches wide. Shape the strips into rounded long cylinders. On a floured surface, cut the strips into 3/4 inch pieces. Press palm down on each piece to form a flat circle (you can shape the corners in with your fingers). With a rolling pin, roll out a circular wrapper from each flat disc. Take care not to roll out too thin or the dumplings will break during cooking - about 1/16th inch. Leave the centers slightly thicker than the edges. Place a tablespoon of filling in the center of each wrapper and fold the dough in half, pleating the edges along one side. Keep all unused dough under damp cloth.
To steam:
Place dumplings on a single layer of napa cabbage leaves or on a well-greased surface in a steamer basket with lid. Steam covered for about 6 minutes.
To boil:
Place dumplings in salted boiling water for 6-8 minutes.

Thursday, June 11, 2009

Curried Couscous with Grilled Chicken Breast

Curried Couscous with Grilled Chicken Breast

It's bikini season, oh yes it is! Lately I have not been eating the best foods in the world so it was a nice surprise when Ina of all ladies, came up with this bikini inspiring curried couscous. We just tossed in some grilled chicken and it made a superb dinner for three... and uh, lunch, and ummm dinner, lunch, dinner. Yes, it's the couscous that keeps on giving.

Ian and I switched out the carrots and extra onion for some blanched green beans, finely chopped red bell pepper, chick peas, and a small grilled chicken breast. Plus we figured that the oil could be cut down to half, considering it is a Barefoot Contessa recipe!

It was so delicious we are going to make this again tonight with quinoa (the trendy grain) and eat it for another week!

Thanks to Ellyn of Recipe Collector and Tester for restoring my faith in Ina.


Curried Couscous with Grilled Chicken Breast
adapted from The Barefoot Contessa
this is our version of the recipe here


1-1/2 cups couscous
1 tbsp. unsalted butter
1-1/2 cups boiling water
1/3 cup plain yogurt
1/8 cup good olive oil
3 tsp. apple cider vinegar
1 tsp. curry powder
1/4 tsp. ground turmeric
1/8 tsp. cyanne pepper (optional, if you like spice)
1-1/2 tsp. sea salt
1 tsp. freshly ground black pepper
1/2 cup red bell pepper, finely chopped
1/2 cup minced fresh flat-leaf parsley
1/2 cup dried currants
1/4 cup blanched, sliced almonds
2 scallions, thinly sliced
1 cup blanched green beans, cut to one inch
1 cup drained chickpeas


Place the couscous in a medium bowl. Melt the butter in the boiling water and pour over the couscous. Cover tightly and allow the couscous to soak for 5 minutes. Fluff with a fork. Grill and cut the chicken into 1 inch pieces. Whisk together the yogurt, olive oil, vinegar, curry, turmeric, salt, and pepper. Pour over the fluffed couscous, and mix well with a fork. Add the grilled chicken,green beans, parsley, currants, almonds, scallions, red pepper,and chickpeas, mix well, and season to taste. Serve at room temperature

Sunday, June 7, 2009

Fluffy Cinnamon Rhubarb Muffins -- Lower Fat!

Rubbarb Muffins

B-Bakes up fluffy and delicious
E-Everyone wins!
S-Starts your day off right
T-Tested four batches just this week!

R-Reliable and quick
H-(w)Hole Wheat goodness
U-Utterly delectable with a cafe au lait
B-Better way to use up that rhubarb
A-Are low fat, Whoot
R-Right, I said Low Fat!
B-Believe it, they are good for you.

M-Mouth watering
U-Undeniable
F-Fantastic for an afternoon snack
F-Fluffy fluffy fluffy!
I-Insatiable cinnamon sugar topping
N-Never had a better muffin (oh it's true)
S-Serve warm, you won’t be sorry!

What else could I say? I first saw these in "fine cooking" but I couldn't take all the fat and sugar, so I played around with the recipe till it was just right! I have been waiting to put these up for a week, but we keep eating the batch before any pictures can be taken. I had to refrain today and keep four aside for photos. With the delicate sprinkle of cinnamon sugar on top, there is no way to stop yourself from devouring each and every muffin. Good thing they are low fat! No really, it’s a good thing or else I would have to join the gym.


Fluffy Lower Fat Rhubarb Cinnamon Muffins
adapted from www.finecooking.com

1-1/4 cups all-purpose flour
3/4 cup whole wheat flour
1/3 cup brown sugar
1/4 cup maple syrup
2-1/2 tsp. baking powder
1 tsp. ground cinnamon
1/2 tsp. baking soda
1/2 tsp. salt
1 cup zero fat natural yogurt
4 Tbs. unsalted butter, melted
1 large egg
1 egg white
1 tsp. pure vanilla extract
1-1/2 cups 1/4-inch-diced rhubarb
For the topping:
1-1/2 Tbs. granulated sugar
1/4 tsp. ground cinnamon

Heat the oven to 400°F Spray muffin tins with oil. In a large mixing bowl, combine the flour, brown sugar, baking powder, cinnamon, baking soda, and salt and blend. In a medium bowl, whisk together the yogurt, melted butter, eggs, maple syrup, and vanilla until smooth. Lightly stir the yogurt mixture into the dry ingredients with a spatula until the batter just comes together; do not over mix. Gently stir in the diced rhubarb. The batter will be thick. Divide the batter among the muffin cups. The batter should mound a bit higher than the tops of the cups.In a small bowl, combine the sugar and cinnamon and mix well. Sprinkle a generous 1/2 tsp. of the cinnamon-sugar mixture over each muffin. Bake the muffins until they’re golden brown and a pick inserted in the center comes out clean, 18 to 22 minutes. (mine took 18) Rotate halfway through baking for even muffins. Transfer to a rack and let the muffins cool in the pan for 5 minutes. Carefully lift the muffins out of the pan. Serve warm.

Wednesday, June 3, 2009

Cinnamon Buns !!

Supper Club, Cinnamon buns

Oh yeah! This was my first EVER yeast bread experience. After tasting these succulent cinnamon buns I don’t know why I waited so long! I have to say, I was really afraid to make these since neither my 'Baking with Julia" nor any of my other cookbooks covered cinnamon buns. So I headed to the place that I had seen them made first, Smitten Kitchen. As with a lot of you out there, this was the first blog that I ever followed, but lately I haven’t been back (so many other blogs to check out). It was at an earlier Supper Club that someone alerted me to the buns, and the bun in HER oven (Congrats!).

I was still a bit weary, especially since the 1055 comments on the buns post were all congratulations and not about the actual cinnamon rolls, so I headed to Smitten Kitchens source. Of course, it was Molly Wizenberg of Orangette, and the book I have been reading, "A Homemade Life". If you haven’t picked up this book, run to the bookstore right now. It is such a wonderful read and after every chapter she gives a mouth watering recipe.

Supper Club, Cinnamon buns
Cinnamon Buns After Second Rise

Anyways, back to the point, I read the 96 raving reviews and started. For some reason I thought that I would need a stand mixer so I employed the help of my friend Alex (yes, a man with a Kitchen Aid!). But even though Alex makes mounds of cookies each week he does NOT own measuring spoons or dry ingredient measuring cups, making the exact addition of 2-1/2 tsp of yeast tricky. This is a man who is doing his PhD in cell biology with yeast, so he should know that even 1/24th of a tsp. extra can mean hundreds of thousands more cells. Ug, but we had no choice and had to approximate it using a regular spoon. Everything I have learned in the past 4 years of lab work about precision went down the drain! Oh well, we got lucky and the dough still turned out great!

When we served these at supper club they were highly praised, I will be making these again.

Just some notes:
1. Make the full amount of sugar cinnamon filling, plus 1/2 more.

2. You don’t need a stand mixer, but if you have a friend with one it makes for a fun afternoon.

3. The best way to do a rise is to put the dough in a 150 degree oven for 30 min to an hour.

4. I cut the rolls, put them in the Pyrex baking dish, and then placed them in the fridge over night so that I could bake them the next day. For the second rise I took them out of the fridge and put them into the 150 degree oven until they were big and squished together. (See second picture)

5. Use PYREX, I did a couple in a metal pan and the bottoms burnt so badly. Someone else in the 96 comments mentioned this also. She was right!

6. Use your favorite cream cheese; don’t worry if it’s the fluffy kind. I used the supper fluffy cream cheese and added 250g instead of 4oz. The glaze was perfect.

For the Recipe:
I didn’t change much of the recipe besides the notes above, so please check it out at the Bon Appétit website; this recipe was created and written by Molly Wizenberg. Just click the link!

Tuesday, June 2, 2009

Picture Tuesday

Well hello everyone, Ian here! Christie and I have been so busy cooking, eating, taking photos and enjoying the nice weather that has come at last. So far this season, Christie and I have managed to get out to the Atwater Market, a local farmers market, twice. I absolutely love the Atwater market, I have fond memories of my mother taking me there to shop for fresh produce and meats when I was a child, and to this day I always use the same butcher that my mother would purchase her meats from. So on weekends, when it is nice out, Christie and I have been heading out there to get our fresh produce, and to enjoy all the beautiful flowers that are on sale this time of year.

Atwater Market, Christie
Christie Biting into a Sausage sandwich at Atwater Market

Atwater Market, Christie
Christie inspecting the goods at a Fruit & Vegetable stand

Besides our weekly trips out to the market, Christie has been keeping up her wonderful “Supper Club” parties, which has just completed a successful fourth incarnation! Each one of the Supper Club get together follows a theme which Christie devises, the last one being “Breakfast for supper”. It went off wonderfully. Approximately 14-16 people show up, and there is a door charge of about 4-5$ depending on what is on the menu, which is a real steal if you ask me. The money covers the ingredients used, and Christie cooks enough food for 16 people each time, wooosh. Just as they were a big hit on the blog, the Eggs in a Basket were definitely a favorite. As a matter of fact, partially due to the fact that I ate prior to taking any pictures, and mostly due to the popularity and general deliciousness of each creation, I actually did not get the time to photograph each of the courses before they were gone, which made my camera sad. You know what they say though, what makes the camera sad only makes the belly happy, ok, I made that up.

Supper Club, Eggs in a Basket
Eggs in a Basket

Supper Club, Eggs in a Basket
Eggs in a basket about 3 seconds before they were gone


Ive got to bug Christie to post the recipe that she used for the Cinnamon Buns (moved the photos up a post to go along with the recipe, and also so they arent doubled up), but for the Eggs in a Basket, see here for the recipe from a previous post. Stay tuned, Im finally buying myself a "Pro" account on Flikr, and will be posting all of the Flower pictures that I have been taking, notably the anticipated "Forget me nots" that Christie has been getting me to photograph every chance I get.