Saturday, February 28, 2009

Ricotta & Spinach Cannelloni


Things I love....
-Pasta
-Ricotta
-Spinach
-Tomato sauce
-Béchamel sauce
-Anthony Sedlak
-yes, you too Ian, the most.

Things that I ate for dinner...
-Pasta
-Ricotta
-Spinach
-Tomato Sauce
... you get the point.

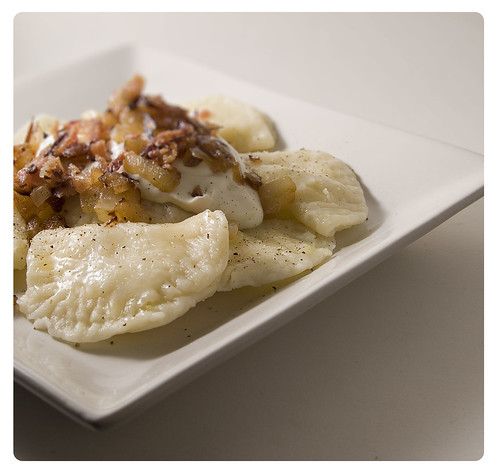
Yes, I took this pic myself, sans Ian so it isn't as nice, but it's getting better. I think.

Ricotta-Spinach Cannelloni
adapted from Anthony Sedlak's book "The Main" 2008
serves 4
Spinach Ricotta filled Cannelloni
4 6x5 inch fresh pasta sheets
8 ounces spinach
1 tbsp butter
2 cups fresh ricotta
1 egg
pinch nutmeg
salt and pepper

Béchamel Sauce
2 tbsp butter
2 tbsp flour
1 1/4 cup milk
bay leaf
salt
freshly ground pepper

Tomato Sauce
1 tbsp olive oil
2 cloves garlic, minced
1 x 690 ml jar good quality Italian brand strained tomatoes
1 tbsp Italian dried herbs
salt and pepper to taste
1 egg white
1 cup grated parmesan
1/2 cup grated mozzarella


Spinach Ricotta Filled Cannelloni
Wash and drain spinach. In a pan, melt butter over medium high heat.
Add spinach and cook until leaves are wilted. Season with nutmeg to taste. Drain cooked spinach in a colander, pressing down firmly to remove excess liquid. Finely chop drained spinach with scissors and gently combine with egg and ricotta. Season mixture with salt and pepper.

Béchamel Sauce
Melt the butter in a saucepan. Stir in the flour and cook, stirring constantly, until the paste cooks and bubbles a bit but does not colour, about 2 minutes. Stream milk in, whisking as sauce thickens. Bring to a low simmer. Add bay leaf, salt and pepper to taste, lower the heat, and cook, stirring for 2 to 3 minutes more. Remove from heat and cover with Clingfilm.

Tomato Sauce
Heat olive oil and garlic in a pot over medium heat. Gently fry garlic for a minute; add strained tomatoes and Italian herbs. Simmer gently about 10 minutes. Season sauce with salt and pepper. Remove from heat. Preheat oven to 375.

To assemble
Lay pasta sheet on a flat surface. Spoon 2-3 tbsp of spinach filling evenly along bottom edge of each sheet. Brush egg white along top edge of sheet. Gently roll bottom edge up and around to form a tube shape. Spread 1/2 cup tomato sauce on the bottom of a medium, oven safe dish. Arrange filled cannelloni on top and pour béchamel sauce over. Spoon remaining tomato sauce just to cover. Sprinkle parmesan and mozzarella cheeses on top and bake until tomato sauce is bubbling and hot around edges, about 20-30 minutes.

Friday, February 27, 2009

Homemade Perogies with Port aged cheddar filling

perogies

Homemade Perogies with Port aged cheddar filling

Good evening, Ian here. So, as promised earlier, I managed to convince my dear mom over today to make up a batch of her homemade perogies! My mother learned how to make these from her mother, a first generation Lithuanian immigrant who used perogie making as an all day long family activity for my mother and her siblings. My mother, when asked about any “ secret family recipe” couldn’t actually provide me with any sort of handwritten recipe, as she informed me that she “used ingredients for this by feel, not measurements”, so this is an effort to capture accurately a record of this really special recipe. I have really fond memories of spending afternoons with my mom when I was little making these and just chatting about my school, and her work, really just the best kind of childhood cooking memories. So, without further ado, here is the recipe for these absolutely delicious result of my mothers family perogie recipe, with a little twist added by myself (p.s it’s the port aged cheddar).

Dough
4 cups all-purpose flour
1/3 cup vegetable oil
2 cups warm water
Salt to taste

Filling
4-5 Yukon Gold Potatoes
½ Brick of Port aged Cheddar (aged cheddar will do fine), Grated
2 tablespoons of Butter
½ cup of 1% milk
Salt to taste

ONION AND BACON
4-5 strips of bacon, fried & finely chopped
1 whole white onion, finely chopped and fried

DOUGH
In a large bowl measure 4 cups of flour. Make a well in the center of the flour, add the oil into the well. Slowly pour the water into the flour and oil, mix with hands and kneed dough until the dough forms into a soft ball. Cut dough ball in half and set one half aside. Sprinkle a cutting board with flour. Place half dough ball onto flour board and roll out dough until the dough is the same thickness as a pie crust dough. Use a cookie cutter, or a medium sized glass to cut out circles in the dough ( you can use any shape here, circles, squares, preferably something that can be folded in two).

PEROGIES
Place 1/2 teaspoon of the potatoe mixture into the center of the dough. Fold the dough together forming a half moon shape. Firmly pinch edges together to seal the perogie. Place formed perogies aside on a plate and arrange so that they don't stick together. Cover with another to prevent the perogies from drying out.
Take the remaining half dough ball and repeat the DOUGH and MAKING PEROGIES steps.

ONION AND BACON
Finely chop onion and add to a frying pan. Fry onion until done. Add bacon strips and fry until crisp, then chop finely

COOKING PEROGIES
Boil water in a large sauce pan. Gently drop perogies into boiling water. Boil for 5-minutes or until perogies float to the surface. Drain perogies using a collander. Place perogies into large serving bowl. Pour onion and bacon mixture over the perogies making sure the perogies are well-coated. This prevents the perogies from sticking. Sprinkle chopped, cooked bacon over the perogies. Serve with sour cream.

Thursday, February 26, 2009

Pavlova Chantilly


Hey there, it's Christie from Toronto. I'm still on my break, but yesterday I finally received an e-mail from "The Barefoot Bloggers" telling me that Ian and I are officially members! Hurray! And what does this membership entail you ask? First, that you have a ton of butter on hand. Second, that every second Thursday of the month you bake, brown, roast, whip, stir, or burn (hopefully not) a specific recipe by Ina, the Barefoot Contessa.

So for the first challenge picked by BMK of Reservations not Required, we had these light and fluffy Pavlova's. The ingredients are simple enough, egg whites and sugar basically, but you have to bake them at a very low temperature for two hours, and then let them sit for another four.

Ha ha, nuts to that. We ate it after one hour of sitting and they were amazing, although the berry stew of strawberries, raspberries, and blueberries, plus the orange scented whipped cream didn’t hurt. The Pavlova melts in your mouth, it is just so light.

But, unfortunately you can only eat one of these beauties, because in following with the practices of the Barefoot Contessa, everything should have at least enough sugar and fat in the dish to kill a small Moose. (Nice Canadian reference there eh.)

Oh, by the way, I took this picture by myself! Im getting better eh! (please say yes Ian)

Pavlova Chantilly
adapted from the book ‘Barefoot In Paris’, 2004
makes 6


4 large egg whites, at room temperature
1/8 teaspoon cream of tartar
Kosher salt
3/4 cups granulated sugar, divided
1/4 teaspoon pure vanilla extract
Whipped Cream with Orange, recipe follows
Stewed berries, recipe follows

Whipped Cream with Orange
1 cups (1 pint) cold heavy cream
1 tbsp sugar
1 tsp pure vanilla extract
1/2 tbsp orange juice

Stewed berries
1 half-pint fresh blueberries
3 half-pints fresh raspberries and strawberries, divided
1/4 cup water
1/4 cup sugar
1/4 teaspoon orange zest
2 teaspoons framboise (raspberry brandy)

Pavlova
Preheat the oven to 200 degrees F. Line a baking sheet with parchment paper. Using a small glass and a pencil, draw 6 (3 1/2-inch) circles on each piece of paper. Turn the paper face-down on the baking sheets. In the bowl of an electric mixer fitted with the whisk attachment, beat the egg whites, cream of tartar, and salt on medium speed until frothy. Add a 1/2 cup of the sugar and raise the speed to high until the egg whites form very stiff peaks. Whisk in the vanilla. Carefully fold the remaining 1/4 cup of sugar into the meringue. With a large star - shaped pastry tip, pipe a disc of meringue inside each circle. Pipe another layer around the edge to form the sides of the shells. Bake for 2 hours, or until the meringues are dry and crisp but not browned. Turn off the heat and allow the meringues to sit in the oven for 4 hours or overnight.
Spread some of the sauce from the stewed berries on each plate. Place a meringue on top and fill with whipped cream. Top with berries and serve.

Whipped Cream with Orange
Whip the cream in the bowl of an electric mixer fitted with the whisk attachment. When it starts to thicken, add the sugar, vanilla and orange and continue to whip until the cream forms stiff peaks. Don't overbeat.

Stewed Berries
Combine the blueberries, one-half pint of raspberries, and one half pint of strawberries with 1/3 cup water, the sugar and zest in a saucepan and bring to a boil. Lower the heat and cook uncovered over medium-low heat, stirring occasionally, for 8 to 10 minutes. The juice will become a syrup and the berries will be slightly cooked. Off the heat, stir in the remaining raspberries and the framboise. Set aside.

Wednesday, February 25, 2009

Beer Battered Halibut with Chips and Tartar Sauce

Beer Battered Halibut with Chips and Tartar Sauce

Beer Battered Halibut with Chips and Tartar Sauce


I did it, hit one right out of the park so to speak. Let me fill you in. My roommate and I have been mentioning on and off for the past few weeks how we should make a dinner of homemade fish and chips, being both huge fans of the meal. So this afternoon, while getting ready for my daily walk, I decided to take a quick look at my new favourite Food Network Chef, Michael Smiths website for recipe ideas. Lo and behold, right there, a recipe for fish and chips, I was excited. Not only had I found a recipe that had piqued my interest, but I had also found something productive to do with my evening.

I found everything I needed at my local grocery store, minus the Halibut. Though there was some halibut labelled “fresh” on the packaging, it also had a special “for quick sale” label next to it, not worth the risk for fish thank you very much. Off to the local fish market I went, and found that they also were out of “regular’ halibut, and only had the “Wild Atlantic” sort, which was actually a very large piece of fish on ice in the counter, when I say big, I mean 4 feet long big, seriously, that’s a big piece of fish. The wild Atlantic Halibut is a wee bit expensive mind you, so stick with the usual supermarket type if possible, saving the wild stuff for special occasions (at 35$ for 4 smallish parts its costly). Any kind of fish that you want to do will suffice, but I have a hard time imagining myself eating Salmon battered and fried (I am also from PEI, so I have seemingly grown a taste for saltwater fish, and detest freshwater fish in most cases). The important thing here is to get yourself nice, thick de-boned cut as they have less risk of being overcooked. For the Chips I went for a no brainer, Russet potatoes. So, without further ado, here is the recipe as adapted from Michael Smiths original. I hope you like it as much as Tom and I did. What are you waiting for? Seriously, get away from your computer and make this tonight, you wont regret it.

Fish
4 x 8-ounce halibut filets
1 cup all purpose flour
½-cup cornstarch
1 teaspoon of baking powder
1 x 12-ounce bottle of your favorite beer
Salt and pepper to taste
More flour for dredging

Tartar sauce
½-cup mayonnaise
2 tablespoons green hot dog relish
1-tablespoon capers
4 green onions, thinly sliced
Juice of 1/2 lemon

Chips
1 small bag of Russet potatoes, peeled


Heat a deep fryer with vegetable oil to 375 degrees and carefully maintain oil until ready to fry.

Chips

Peel the potatoes, approx 2-3 medium sized potatoes per serving is fine. Cut the potatoes lengthwise into ¼ inch fries, then place into a bowl of cold water and allow to soak for 20 minutes. Drain water and pat dry with a paper towel. Cook in fryer until golden brown. Place in oven at 200 degrees on a baking sheet to keep warm until fish is ready to serve. Salt as desired to taste.

Fish
Whisk together flour, cornstarch, baking powder and salt and pepper. Add beer and stir just until combined. If batter is over mixed, it will be tough.

Dredge halibut in flour then dip in batter. Allow any excess batter to drain away, then slowly, carefully, dip the fish into the hot oil. Fry until golden and crispy and fish is cooked through, approximately 8 to 10 minutes. The oil temperature will drop a bit, 365 degrees is ideal.

Tartar sauce
Whisk together the mayonnaise, relish, capers, green onions and lemon juice. Serve with the fish.

Tuesday, February 24, 2009

Simple Roast Beef

Simple Roast Beef


So, Christie has hopped onto a train headed to Toronto this morning to spend some time with her much missed family, and that leaves poor me to entertain anyone reading this with my shenanigans. First things first, I would like to come correct about this whole “eating baloney sandwiches” business that Christie noted.. I have not actually eaten a baloney sandwich since I was a little kid in elementary school. Okay so I feel better now. On to it.

Since my surgery two weeks ago, I have not been able to play my weekly games of hockey, which take place Thursday evenings & Saturday afternoons, leaving me sorely missing my weekly testosterone sessions. One thing a few of the guys tend to do every Saturday is to come back to mine and my roommates appt after 2 hours worth of running and immediately order the greasiest food possible, which as you can imagine just ruins the whole exercise in the first place. So this past Saturday I decided to do something a little different since I could not attend, I used the time to cook up a healthy meal for 6, and also give Christie a break for a night.

My roommate had picked up a family sized Roast Beef the evening before, and with his permission, and the loads of veggies Christie brought over that she had kicking around in her fridge I managed to put together a pretty delicious and healthy dinner.

Please note: All of the veggies were fresh, you can choose to remove any, or even add any as you like. It’s always easier to use your standard Veg here, but seasonal veggies are always a good addition.

Simple Roast Beef

1 Family sized Roast Beef (enough for at least 2 slices for each person)
2 cups of Beef Broth
1 whole white onion
3 Cloves of Garlic, chopped
Carrots, peeled and quartered
Brussell sprouts, chopped in half
Whole White Mushrooms
Celery root, chopped into squares
Fresh Rosemary, chopped
Virgin Olive oil
Salt
Pepper

-Preheat Oven to 350 degrees (note, I chose this temperature rather than 450 because a) I had the extra time to let it cook, and b) a lower temperature reduces the shrinking that happens at higher temperatures with roasts, we want this as juicy and tender as possible no?)
-Prepare veggies, then toss in a bowl while pouring Olive oil until lightly covered
-Place roast, fat side down, on a cutting surface and make 3-4 small cuts (approx ¼ inch deep) from side to side along the roast
-Pour 1 cup of the beef broth into a large roasting pan
-Put the Roast, cut side down into the broth, and let it sit in the broth for just a minute, then turn over
-Sprinkle the freshly chopped rosemary along the top of the roast, making sure to put more into the cuts that were made earlier. Add salt & pepper as desired
-Place the prepared veggies around the roast, making sure to create an even layer all around the roast.
-Cover, place in oven.

Now, depending on the size of roast the cooking time(s) will vary, about 35 minutes a pound for medium, so every 45 minutes or so check your roast by opening the lid and adding a little more broth as needed to make sure the veggies don’t burn, for my roast I needed the whole 2 cups. The best way to check if your roast is done is to use a meat thermometer, 150-160 degrees for medium rare, and 160-170 for medium. I am a little lucky as my dear mom taught me to check meats by feel at a young age, and speaking of my mom, she just may help us out by coming by and making her famous Perogies from scratch, so stay tuned!
Once the roast is done, slice a few pieces starting at an end, and place all the veggies together in a serving bowl, voila!

Monday, February 23, 2009

Fudgy Brownies

Brownies
I did it again, I licked the bowl clean. Twice. But come on, these brownies are pure Valrhona Chocolate, butter, and sugar. They are so intense that you can only eat one at a time, and it had better be served beside a mound of vanilla ice cream, or else you may be in trouble... or heaven... depends on your deep dark chocolate threshold.

Ian and I had problems with this batter along the way. I don’t mean the taste, oh no, don’t get me wrong. I don’t think it is possible to create a bad tasting dish with that much chocolate in a serving. Our problem was with the butter. It kept separating out of the batter, so much so that you could drain the molten butter out of the pan of cooked brownie. During the first batch the pan became super greased from all the separated butter and the whole bunch of brownies fell on the ground when I tilted the pan. ALL on the floor. EVERY single last crumb. I was so sad, but determined, and once again we started the process to brownie heaven.

The second batch came out great. Turns out you have to add room temperature chocolate to room temperature butter. Who knew? (Probably everyone)

p.s. These came from my new cookbook called Chocolate & Vanilla. One side of the book is only chocolate recipes, and if you flip the book upside down and start from the back, there are only vanilla recipes. Oh how I love you cookbook.

Fudgy Brownies
adapted from Gale Gand's "Chocolate & Vanilla"
makes 18 brownies

11 ounces of Valrhona chocolate
12 tbsp. unsalted butter
1- 1/3 cups sugar
3 large eggs
3/4 cup flour
1/4 cup cocoa powder
1/4 tsp. salt

Preheat oven to 375 degrees. Line a 12 x 17 inch baking dish. Melt chocolate in microwave, and then when cooled but still liquid, add room temp. butter and mix until butter has melted into chocolate. Stir in sugar, eggs, flour, cocoa powder, and salt. Spread batter in baking dish and bake for 10-15 minutes. Let cool and serve.

Sunday, February 22, 2009

Roast Pear, Walnut, and Cambezola Salad

PearWalnutSalad
Tonight we were invited to a dinner party at Ian’s best friend Steve and his wife Gabby's apartment. These two are super great people and so are all of Ian’s friends, so naturally I was excited.

We were told that Gabby was making an extravagant lasagna, and boy oh boy, she did not disappoint. This lasagna was packed with at least a couple of different cheeses, mushrooms, ground beef, and even a nice layer of spinach to round everything out. Thanks guys.

Ian and I wanted to make something nice and simple to bring over, so we brought my favourite salad made of roast pear, walnut and Cambezola. The Cambezola is actually a mix of Camembert and Gorgonzola, which makes it a very mild tasting, smooth and creamy cheese. Pears and walnuts are a natural pair, and the addition of the cheese and walnut oil brings everything together.

You want to know how good this salad is? When I made it for my dad a year ago he asked for seconds! Seconds! Of salad! It’s green, and as we all know he doesn't eat anything green! So give it a try, even the green haters out there will be happy with it.


Roast Pear, Walnut, and Cambezola Salad
Adapted from Licence to Grill, Foodnetwork.ca

3 x pears, cut into eighths, seeds and cores removed
1 cup of walnuts, toasted
3 tbsp of honey
ground pepper
4 cups of Spring Mix Salad
150g of Cambezola Cheese cut into 1/4 inch wedges

Dressing
3 tbsp of walnut oil
6 tbsp of sherry vinegar
2 tbsp of honey
Salt and pepper to taste

Roast Pear, Walnut, and Cambezola Salad
Preheat oven to 350 degrees. Toss pears in honey and pepper mixed with 2 tbsp. water to create syrup. Roast in oven for 20-25 minutes, covered in foil. Place spring salad mix into a bowl and drizzle with the dressing. Toss. Add toasted walnuts, cheese and roasted pears.
Dressing
Combine the dressing ingredients and mix thoroughly.

Saturday, February 21, 2009

Loopy Mini Cupcakes

Cupcakes
Ok, today we have become kids again, but now we are free of all those binding rules (sorry mom, love you).

I saw these loopy mini muffins and thought "Ian will go crazy over these, I am going to make them for him" because seriously, we are grown ups now, we can eat cereal with our dessert, or even dessert for breakfast. This freedom is pretty much all that I wanted when I was young. I also wanted to eat only chocolate bars for a week straight, but mini cupcakes will do.

The thing that makes these little guys killer is that the fruit cereals flavours are in the batter. Orange, lime, and lemon paired with Fruity Cheerios™ (sorry, not Froot Loops™, the Cheerios version is made with real fruit juice, smaller, and they don’t tear apart the roof of your mouth) that completely increase the cereal flavour. There is even milk in the recipe! I made one batch and they were gone before they could cool, so was the second batch for that matter.

Loopy Mini Cupcakes
adapted from The Breakfast Cereal Gourmet by David Hoffman
makes 18 mini cupcakes

4 tbsp. unsalted butter
½ cup sugar
¼ teaspoon vanilla
1 egg
¾ cup sifted all-purpose flour
¾ teaspoon baking powder
1/8 teaspoon salt
¼ cup milk
Zest of half and orange
Zest of half a lemon
Zest of half a lime
¾ cup Fruity Cheerios
Powdered sugar

Preheat the oven to 350 degrees. In a large bowl cream the butter and sugar until light and fluffy. Add vanilla and egg, mixing in well. In a medium bowl, sift together the flour, baking powder and salt. Mix into the butter mixture alternating with the milk. Add orange, lime, and lemon zest to batter. Spoon the batter into muffin pans lined with cupcake paper cups, filling them three-quarters full, and pushing cereal in to the top of each muffin, covering the surface. Bake for 8 to 10 minutes, until the cupcakes are puffed and firm in the center. One cooled dust with powdered sugar.

Friday, February 20, 2009

Simple Italian Tomato Sauce with Meatballs

Pasta
Finally, my exams are over and Ian and I have been reunited once again. I rushed over to his house after my exam and imagine what I saw.... Ian and his roommate, unshaven, in their pjs, watching Paris Hilton's "My New BFF". Yes, it's true. Both of them were sick this week and daytime TV reduced them to this. Although I'll admit it, my brain was fried from an intense exam, I too sat down with them and watched the horrendous atrocity. It was so bad. So, so bad.

If I hear one more person say 'frenemy' (friend and enemy) or 'ttyn' (talk to you never) I will start shooting at the TV.

Ok, now that that rant is out of the way, on to dinner. I had to get them out and shaven so we went to the grocery store and within a couple hours were eating home made Italian meatballs with penne and freshly grated parmigiano reggiano to top it off.

This is usually a fail safe method to good tomato sauce, and you can substitute sausages for meatballs, it works just as well. The key here is to buy the best canned whole tomatoes that you can find, like Pastene or any tomato grown and picked in Italy. The idea is that it is an Italian tomato that is picked at its prime and cooked only once. The diced tomatoes and tomato puree are cooked twice and lose a lot of their flavour. Also, putting the tomatoes through a ricer gives it the perfect texture and is a step that shouldn’t be forgotten.

Ok, I will tell you the secret to perfect meatballs. Mix in a couple ladlefuls of sauce when you are mashing the meatballs together, that way they will never be dry. I can't believe I just gave that away. Use it wisely. ttyn (just punch me now).

Simple Italian Tomato Sauce with Meatballs

Sauce
2 cans whole tomatoes
1 large onion
3 cloves of garlic, minced
salt and pepper
1 tbsp Italian seasoning

Meatballs
300g lean ground pork
300g lean ground beef
1 clove of garlic, minced
1/2 cup bread crumbs
1/2 cup parmesan cheese
salt, pepper, and Italian spice
1/2 cup tomato sauce
1 egg

Sauce
Soften the garlic and onion in oil. Once softened, pass the tomatoes through a ricer into the pot. Add Italian spices and season with salt and pepper. Simmer on low for 1-1/2 hours.

Meatballs
Preheat oven to 350 degrees. Add all ingredients together and mix thoroughly with hands. Form into 1 inch balls and place on baking sheet. Bake for 15 minutes, then add to the sauce. Make sure sauce simmers for minimum 45 minutes so that the meatballs become fully cooked.

Thursday, February 19, 2009

Onion Soup Emilia-Romagna Style with Roast Bone Marrow- Guest Blog Day


Ok, so I have been super busy with exams (damned you physics, I would do just fine without gravity.... I think) so I begged my brother to guest blog today about his crazy culinary experiences. Seriously, they are sometimes really out there. Like this weekend he cooked a pig head. I have the pics but am kind of afraid to post them. This is one of his more toned down recipes adapted from Mario Batali (the famous redhead chef in shorts and crocs). It looks great and I can't wait to try some when I get back to Toronto next week. So without due, here is my brother, Eric.

Onion Soup Emilia-Romagna Style
Roast Bone Marrow

So, since discovering early last year that I in fact like cooking, I have been embarking on an understanding of many classic dishes to try and expand my culinary knowledge. I started with basics, like pasta sauce and chili, but due to unforeseen circumstances this summer, I didn’t have a job and thus sat around the house waiting for dinner time so I could cook. I started to branch out and learned a few interesting new dishes such as pad thai, but for the most part, my ingredients were pretty average. I never pushed myself out of my comfort zone, especially when it came to proteins. This all changed once I got my cooking club.

Yes, I started a cooking club once I got back to school. And even though our meals were basic enough, it made me more interested in trying new things. Around Christmas, this took another turn, when my partner in the cooking club and I decided our end-of-the-year feast would be a whole pig that I would butcher and we would cook. I wanted to learn to butcher something substantial and he wanted to smoke meats Southern-style. This seemed like a perfect marriage of the two ideas.

Since then, I have been buying a new piece of pig almost every week in the market to test out, not wanting to be doing anything for the first time when I eventually get this whole beast. However, it has opened me up to many other parts I never figured I would want to try my hand at. I cooked my first lamb shank a few weeks ago for instance, and it was delicious. I bought a whole, 7lb. pork shoulder, put it in the oven at 8:30a.m. one morning, took it out at 5p.m., shredded it and had friends over for a pulled pork sandwich feast. All because I was interested in pushing myself beyond my comfort zone.

This energy to step outside the comfort of the average meal, combined with a need to find recipes to cook all parts of the pig, led me to Fergus Henderson’s The Whole Beast: Nose to Tail Eating. Henderson is the head chef of the St. John in London, England, the original nose-to-tail restaurant (Sorry Martin Picard fans, he ripped off a limey). The restaurant is revered by chefs worldwide because of the ability of Henderson to take the cuts people do not eat anymore and turn them into top-notch cuisine. Anthony Bourdain said his death row meal would be from the St. John. Batali said the recipes make him want to “Torch my own Babbo for pretending to be a restaurant and move to London to heed the master’s call”. I’m assuming the food is good.

The one recipe I wanted to cook immediately was the Onion soup and the Bone marrow on toast. I had wanted to try bone marrow for awhile, and the pairing seemed easy enough. So I was determined to making it for my reading week. In the end, I overdid the bone marrow, which caused half of it to turn to liquid, but the remaining marrow was delicious and meaty. I look forward to trying out more of the recipes in the coming months until my date with Destiny (the name I have given the pig I will be butchering) comes.

Onion Soup Emilia-Romagna Style
adapted from Mario Batali’s book “Molto Italiano”
Makes 3 servings.

2 tbsp butter
2 tbsp lard or fatback
6 red onions, halved and sliced into thin half-moons
2 tbsp flour
¼ cup dry white wine
4 cups beef stock
¼ cup grated parmesan
3 slices crusty bread
2 tbsp extra-virgin olive oil

1. Melt butter and lard in a large heavy-bottomed pot over low heat. Add the onions and cook slowly for 30 minutes, stirring occasionally and allowing them to develop a rich brown colour.
2. Add the flour and stir until smooth and lump-free. Cook for 15 minutes, stirring frequently. Gradually add the wine and stock, stirring gently but constantly. Increase the heat slightly, cover, and cook for 30 minutes at a brisk simmer.
3. Preheat the broiler.
4. Bring the soup to a boil and remove from the heat. Season to taste with salt and pepper.
5. Grill the bread under the broiler. Drizzle with olive oil and place 1 toast in each warmed soup bowl. Sprinkle with parmesan.
6. Ladle the soup into the bowls, and serve.


Roast Bone Marrow
Adapted from Fergus Henderson’s book “The Whole Beast”

Put six 3-inch pieces of beef marrowbone in an ovenproof frying pan and place in a hot 450 oven. The roasting process should take 20 minutes, depending on the thickness of the bone. The marrow should be loose and giving, but not melted away, which it will do if left too long.
Scrape the marrow from the bone onto the toast and season with coarse sea salt.

Wednesday, February 18, 2009

Maple Cranberry Banana Mini Muffins


I know, the pic isn’t nearly as nice as the normal ones, that’s because Ian is still sick at home and I had to use my old school floppy disk camera. Plus I suck at photography and no amount of photoshoping will fix it. Some time soon Ian is going to teach me how to use his beautiful SLR, but I fear the photography gene is not in me and his camera wont help all that much. I even got out his fancy light box to see if it would help take a better picture. It didn’t, it actually created quite the opposite effect, and so, to help my sadness I ate all four of these mini muffins that I so neatly lined up for the photo shoot, plus a couple more.

Its alright though, these mini's were made for healthy snacking. They are packed full of banana that replace most, but not all of the butter, maple syrup instead of white sugar, whole wheat flour, egg whites, orange zest, walnuts, and glorious cranberries. I took one look at them on food blogga (who's pic is so much nicer) and had to put a Canadian spin on them with some maple syrup and walnuts. Also I tried to cut down the butter to a mere 3 tbsp. Not bad eh.

One of my biggest pet peeves is when bakers don’t put enough cranberries in their muffins, or they only put them on top so that it looks like the muffin is crammed with burst in your mouth berries, but really it is just a dry mess underneath. So, I decided to cram these little guys with cranberries, and then place one on the top like a beautiful red ruby.

They are really good in the morning, and I typically have been eating them before dinner, after dinner, at lunch, and throughout the day. So, I guess they make the perfect anytime snack.

Maple Cranberry Banana Mini Muffins
adapted from Food Blogga
Makes about 36 mini muffins

1 cup all-purpose flour
1 cup whole wheat flour
1-1/2 tsp. baking powder
1/2 tsp. baking soda
1 tsp. salt
1/4 tsp. ground cinnamon
1/2 cup dark brown sugar
1/2 cup maple syrup
2 tsp. pure vanilla extract
3 tbsp. unsalted butter, melted
1 large egg
4 egg whites
2 ripe bananas
zest of one orange
2/3 fresh or frozen, unthawed cranberries
1/4 cup walnuts, finely chopped

Preheat oven to 375 degrees. Add mini paper muffin cups to mini muffin pan. Combine flours, baking powder, baking soda, salt, and cinnamon in a medium bowl. In a large bowl, combine brown sugar, maple syrup, vanilla, butter, and eggs; beat until smooth. Add the bananas and orange zest and lightly beat until blended. Add the flour mixture, mixing until just combined. Fold in the cranberries and walnuts. Spoon the batter evenly into the muffin cups. Bake 13-15 minutes, or until the tops are golden.

Tuesday, February 17, 2009

Traditional Seville Orange Marmalade - Guest Blog Day


Today is guest blog day again! I know, I'm excited too. This weekend my mom and auntie got together in Toronto to create this incredible Seville Orange Marmalade, and lucky us, my mom is sharing it with us! Look at how good that bread looks, I want to reach into the screen and eat it, but I won't (no promises). So, without due, here is my loving mom...

Traditional Seville Orange Marmalade
In April 2007 I was in Rome with my sister where we sampled this delicious marmalade that Antoinetta (from Rome) and Michael (from Ottawa) had made. I got their recipe and when the Seville oranges arrived in February, a full 10 months later, my sister and I spent a Sunday afternoon cooking up a few batches. It’s a hugely tedious task, but well worth the effort. The marmalade was such a hit with family and friends that we made it again this weekend. We call it our “sunshine in a jar”.

Traditional Seville Orange Marmalade
adapted from Delia Smith’s book Delia's How to Cook: Book Three
Makes six 1 lb (350 ml capacity) jars

2 lb (900 g) Seville oranges
1 lemon
4 lb (1.8 kg) granulated sugar
You will also need a preserving pan or a large, heavy-based saucepan; a 9 inch (23 cm) square of cheesecloth; some string; a funnel; and six 1 lb (350 ml capacity) jars, sterilized.

Begin by measuring 4 pints (2.25 litres) water into a preserving pan, then cut the lemon and oranges in half and squeeze the juice out of them. Add the juice to the water and place the pips and any bits of pith that cling to the squeezer on the square of cheesecloth (laid over a dish or cereal bowl first). Now cut the orange peel into quarters with a sharp knife, and then cut each quarter into thinnish shreds. As you cut, add the shreds to the water and any pips or spare pith you come across should go on to the cheesecloth. The pith contains a lot of pectin so don't discard any and don't worry about any pith and skin that clings to the shreds – it all gets dissolved in the boiling.

Now tie the pips and pith up loosely in the cheesecloth to form a little bag, and tie this on to the handle of the pan so that the bag is suspended in the water. Then bring the liquid up to simmering point and simmer gently, uncovered, for 2 hours or thereabouts until the peel is completely soft (test a piece carefully by pressing it between your finger and thumb). Meanwhile, chill the saucers in the freezer.

Next, remove the bag of pips and leave it to cool on a saucer. Then pour the sugar into the pan and stir it now and then over a low heat, until all the crystals have dissolved (check this carefully, it's important). Now increase the heat to very high and squeeze the bag of pips over the pan to extract all of the sticky, jelly-like substance that contains the pectin. As you squeeze you'll see it ooze out. You can do this by placing the bag between two saucers or using your hands. Then stir or whisk it into the rest.

As soon as the mixture reaches a really fast boil, start timing. Then after 15 minutes spoon a little of the marmalade on to one of the cold saucers from the freezer, and let it cool back in the fridge. You can tell – when it has cooled – if you have a 'set' by pushing the mixture with your little finger: if it has a really crinkly skin, it is set. If not, continue to boil the marmalade and give it the same test at about 10-minute intervals until it does set.

After that remove the pan from the heat. Leave the marmalade to settle for 20 minutes.

In the meantime, the jars should be washed and sterilized. Pour the marmalade, with the aid of a funnel or a ladle, into the jars, cover with sterilized discs and seal while still hot. Label when cold and store in a dry, cool, dark place.

Monday, February 16, 2009

Rosemary Roasted Plums, Roasted Celeriac, and Frisee Salad with Shallot and Toasted Walnuts - Valentine's Day Part 3

Plums
On to Valentine's Day Part 3.
So today I am going to recount the delicious side dishes that accompanied our main duck dish on Valentine's day.

Have you ever had celeriac? The first time I saw it I thought it was a joke; this weird grey tuber looks just like a brain and is pretty large. I have been meaning to buy some for a while but whenever I pick one up, something about its menacing look makes me second guess the veggie, and I opt for potatoes instead. Luckily for this modest plant, Valentine's Day was a chance to expand our culinary expertise, and it was really good! Celeriac is the root of a celery plant; so naturally, it tasted like a mix between celery and a potato. The heaps of butter and thyme it roasted in didn’t hurt it either.

The second side dish was my favourite, and possibly the best food I have eaten all year. Roasted plums with rosemary and a port reduction. Uhhhh, just writing the words is making me salivate. They were so good paired with the duck, which naturally does well with fruits, but I really wasn’t expecting them to pack such a punch, and nearly left them out of the dish altogether. Thank gosh I didn’t. Also, don’t go thinking that you have to wait till plums are in season, I bought three semi ripe plums in the dead of winter, imported from who knows what country half way around the world, and they were still incredible.

Finally the last side was a simple frisee salad with shallots and toasted walnuts. Oddly enough, with all this extravagant food Ian found this side to be his favourite. But then again he likes anything with a lot of acidity.

So I hope you had fun reading about our wonderful day, we had a blast cooking and eating.


Rosemary Roasted Plums, Roasted Celeriac, and Frisee Salad with Shallot and Toasted Walnuts
adapted from Anthony Sedlak's book "The Main" 2008

Roasted Plums
3 plums, halved and pits removed
2 tbsp sugar
2 sprigs rosemary
1 tbsp olive oil
salt
1/2 cup port

Roasted Celeriac
2 large bulbs celeriac
2 tbsp olive oil
2 tbsp butter
2 sprigs thyme
salt and pepper

Frisee Salad
1 head frisee
1/4 cup walnuts, toasted and chopped
1 small shallot, finely minced
1-1/2 tbsp red wine vinegar
3 tbsp olive oil

Roasted Plums
Preheat oven to 400. In a bowl, toss to combine plums, sugar, salt, rosemary and olive oil. Arrange plums in pan and roast until plums are soft, 30 mins. Transfer plums to serving dish. Deglaze plum roasting pan with port and bring to simmer, reducing volume by half. Season with salt and pepper. Pour over plums.

Roasted Celeriac
Peel and cube celeriac into large bite sized pieces. Heat olive oil in large skillet. Sear celeriac until light golden on all sides; add butter and thyme sprigs. Transfer to baking dish. Season to taste with salt and pepper and roast in 400 oven until outside is golden and insides are tender, about 30 minutes.

Frisee Salad
Combine shallot, red wine vinegar and olive oil in a medium mixing bowl. Season with salt and pepper. Add frisee and top with toasted walnuts. Toss well.

Sunday, February 15, 2009

Pan Fried Duck Breast with Orange, Thyme, Parsley, and Juniper Berry Rub with Blood Orange Relish - Valentine's Day Part 2

Valentines Day Duck
Ok, so Valentine's Day part 2, The Meal.
I don't think that I can get everything that we ate into this one little blog post so I'm going to explain the duck with its luscious Orange relish, then tomorrow I will go into detail about the side dishes. Yes, we totally went all out with this meal but it was oh so worth it. And come on, it's Valentine's day, I had to show my man how much I loved him by filling his pie hole with as much good food as I could muster up.

I love duck, and I adore it even more with a fruity sauce, but I have never had the guts to actually cook the bird. What if I screwed up, that’s a 12 dollar hunk of meat. But, when I went to the store early Valentine's day morning to get the sickie his Captain Crunch, I saw that there was a sale on Magret duck breasts and decided that if I screwed up, it wouldn’t cost us as much. I also saw Anthony Sedlak making this duck recipe a couple times on TV and he made it look quite easy, so I was feeling adventurous.

Really, it was just as easy as he made it seem. The key is to pan fry the duck at a low temperature and the fat literally melts away. If you keep spooning the fat out of the pan then the skin becomes delicious and crispy, giving you half a cup of duck fat to freeze and make all kinds of delightful dishes with. Then just pop the duck breast into the oven for another few minutes to finish it off, and you’re done! Plus, the juniper berries, thyme, parsley, and orange rub adds so much flavour to the duck.

I truly enjoyed the blood orange relish that accompanied the duck. This meat pairs perfectly with any sort of fruit and you really can’t go wrong. Actually, I was just really proud of myself for making orange relish, like really, who can say that they have made that.


Pan Fried Duck Breast
adapted from Anthony Sedlak's book The Main
serves 4

3 duck breasts
1 tbsp black pepper
zest of 1 orange
1 1/4 tbsp crushed juniper berries
1/4 cup chopped parsley
1 tbsp thyme leaves
1 tsp coarse sea salt

Orange Relish
1 large orange
3 tbsp sugar
2 tbsp white wine vinegar
salt and pepper to taste

Pan Fried Duck Breast
Score skin side of breast in criss cross pattern. Combine black pepper, orange zest, juniper berries, parsley and thyme and pat firmly onto flesh side of duck breasts. Let sit for 30 minutes.
Preheat oven to 400. Let duck breasts stand at room temperature for at least 10 minutes.
Season generously on flesh side with coarse sea salt. Place duck skin side down in a large cold, oven proof skillet and cook slowly over medium heat. Remove liquid fat from pan as it accumulates, until skin becomes crispy and golden, about 8-10 minutes. Finish cooking in oven about 7-10 minutes. Let rest for 10 minutes before cutting thinly against the grain.

Blood Orange Relish
Cut off orange peel, avoiding white pith. Blanch peels briefly in boiling water; drain and chop roughly. Trim off and discard white pith from orange. Cut orange into small pieces and combine with chopped peel, sugar and white wine vinegar in a small pot. Simmer gently until liquid cooks down and relish becomes slightly syrupy, about 5-6 minutes; season with salt and pepper.

Saturday, February 14, 2009

Baked Pears filled with chocolate, Almonds, and Orange in a Flaky Pastry Shell - Valentine's Day Part 1

Pear Dessert
So this is Ian's and my Valentine's Day Part 1, and of course why not start off with dessert? Today is also our first year anniversary (yay) and we had this amazing reservation at one of the top restaurants in Montreal that we had to book many weeks in advance. Unfortunately with all that was going on this week we had to cancel and spend the night inside, which was a lot of fun!

If you stick around for the next couple days I will be posting the other delightful aspects of our meal, but today we do dessert. And what a dessert it was. I was just flipping through this Jamie Oliver book called Jamie’s Kitchen that I took from home, and this recipe screamed out from between the pages at me. How could I say no? Chocolate inside a pear wrapped in flaky pastry, come on, there isn’t a person out there strong enough to say no.

Now, I don’t know how to accurately explain how marvellous the taste was, it was just so incredible. These little bundles were all you thought they would be, and more. Each flavour played perfectly with the others and came together to make this "Super Dessert". It’s probably what superman eats every day to keep his energy up. I think the key factor to keep in mind is to use good quality chocolate. In this I used Vhalrona Chocolate, but most quality 70% chocolates will do. To put it over the top I served them straight out of the oven with a huge scoop of vanilla bean ice cream on the side.

Now you might be like me and think that filo pastry is daunting and not worth the work. Let me tell you, it is so simple and easy to work with, just buy a package of frozen sheets and slather each layer in butter. This was actually the first time that I worked with filo and I am now saddened that I waited so long. I will be making many more recipes with these flaky tender sheets. Watch out world, I’m going to cover everything in filo!

So just to rub it in, on a day that is practically dedicated to chocolate, Ian and I ate the ultimate in chocolate desserts.

Baked Pears Filled with Chocolate, Almonds, and Orange wrapped in Flaky Pastry
adapted from Jamie's Kitchen, 2002
4 pears
3 tbsp. blanched almonds
6 tbsp. butter
3 tbsp. sugar
Zest of one orange
2 ½ oz Vhalrona chocolate 70%
16 sheets of filo pastry, defrosted, 8x8 inches

Preheat oven to 350°F. Peel pears and cut core out from the bottom. In a food processor chop almonds, then chocolate. Place in bowl and add sugar, orange zest, and 4 tbsp. of butter. With hands, mix together until uniform. Put ¼ of mixture into bottom of pear, pack extra filling around the base. Repeat for three others. Take one sheet of filo and brush with heated remaining butter, then stack with another filo sheet. Repeat stacking and brushing with butter until there are 4 layers. Wrap pear in filo and twist at the top to keep the package closed. Repeat for other pears. Bake for 25-30 minutes. Serve with vanilla ice cream.

Friday, February 13, 2009

Chicken, Lemon, and Olive Stew with Saffron Couscous

Chiken Lemon Olive Stew
While I was sitting around worrying about Ian these past few days I randomly picked up this great food magazine called Fine Cooking. Each recipe looks and sounds amazing, so when Ian said he was in the mood for couscous I, his makeshift nurse, knew exactly what to make.

Ian is also a large fan of any type of citrus, especially lemon, and he loves olives. My mom once gave him a jar of olives as a small gift and he was ecstatic. Needless to say, with the first bite he took of this scrumptious stew a big mmmmmmmmmmmmmmmm escaped his mouth. I felt the same way too; the simplicity of the saffron couscous complemented the tangy chicken, olives, and lemons.
Thanks new magazine! Enjoy.


Chicken, Lemon and Olive Stew with Saffron Couscous
adapted from Fine Cooking Magazine No.96

Stew
12 boneless, skinless chicken thighs and or legs
Salt and pepper
1/8 cup extra-virgin olive oil
2 onions, thinly sliced
4 cloves garlic, chopped
1/2 tbsp ground turmeric
1 tsp ground cumin
1 tsp. ground coriander
2 small dried red chiles, crumbled
1 cinnamon stick
2 bay leaves
2 cups low-salt chicken broth
Finely grated zest and juice of 2 lemons
1 cup canned chickpeas, rinsed and drained
1 cup green olives

Saffron Couscous
1/2 cup couscous
1/2 cups low-salt chicken broth
2 Tbs. unsalted butter
1/2 tsp. saffron threads, crumbled
salt
1 tbsp extra-virgin olive oil

Stew
Season chicken all over with salt and pepper. Heat the oil in a Dutch oven over medium-high heat. Working in 2 batches, brown the chicken all over, transferring batch to a plate.
Reduce to medium heat, add the onions and garlic and cook until the onions are softened and brown, 5 to 6 minutes. Add the turmeric, cumin, coriander, chiles, cinnamon sticks, and bay leaves, cook until fragrant, about 1 minute more. Add the chicken broth, lemon zest, and 1/4 cup of the lemon juice. Cover and simmer over medium-low heat for 30 minutes.
Return the chicken to the pot. Stir in the chickpeas and olives. Increase the heat to medium high and simmer uncovered, stirring occasionally, until the chicken is cooked through, 6 to 8 minutes. Stir in 1 Tbsp. of the remaining lemon juice and season to taste with salt and pepper. Serve over the Saffron Couscous.

Saffron Couscous
Put the couscous in a large bowl, set aside. In a small saucepan, heat the chicken broth, butter, saffron, and 1 tsp. salt over medium-high heat until the butter is melted and the broth is hot. Pour the mixture over the couscous. Cover the bowl with plastic wrap until the liquid has been absorbed by the couscous, 10 min. Drizzle with olive oil then using a fork, gently mix the couscous and break apart any clumps.

Thursday, February 12, 2009

Easy Everyday Ham


So Ian is allowed to eat today, but really, all he wanted was a grilled cheese sandwich and Campbell’s® Tomato Soup, so I am going to post a dinner that we made about a week ago.

This is the easiest and tastiest recipe ever. You know those hunks of smoked ham that you always pass at the supermarket, well go back and pick one up, it is super cheap. Then go get yourself a can of pineapple rings and dust off the cloves on your spice rack. That’s all you need, and in an hour you will have a smoked ham that feeds four, with leftovers for lunch, and for pennies. I’m not kidding. Try it, and then thank Ian and me. Enjoy.


Easy Everyday Ham
2 pound smoked ham, can be bigger or smaller
1 can of pineapple rings
20 cloves

Preheat the oven to 350 degrees. Put ham in large roasting pan. Cover with pineapple rings; stick them in place with the pointy end of the cloves. Pour leftover pineapple juice in bottom of roasting pan and cover with lid. Roast for 1 hour, or 30 minutes per pound. Cut and serve with applesauce and mustard.

Wednesday, February 11, 2009

Get Well Soon Ian


Ian is really sick so lets all wish him well. I can't wait till he is back home. He wasn't allowed to eat anything today so he sat around for about five hours and listed off all the things he wanted to eat. Here is a bit of that list.
perogies
double cheese burger
smoked meat sandwich
tortellini en brodo
chicken nuggets
lasagna
home made fries
dill sauce
spiral Kraft dinner
fish & chips
poutine
pogo
and many others that I have forgotten.
Get well soon Ian.

Tuesday, February 10, 2009

My Favorite Brussel Sprouts


Were you one of those kids who hated brussel sprouts or anything green? My brother, my dad, and I were, and to this day my dad still is. He won’t eat anything green, except for peas which he says should be purple. They just made a mistake. But this Christmas I actually got him to try one of my brussel sprouts. I wish I had my camera, not even my grandma had ever seen him eat a brussel sprout. In his defense, it was only a quarter of one and he ate it with a fork full of roast beef, gravy, and mashed potatoes.

So, if my dad will try one of these flavourful baby cabbages, then they must be good right? Yep, they are great. Actually they are my favorite side dish.


The best way to make brussel sprouts is to cut them in half, caramelize the insides with lemon juice, and then let them simmer for a good while. If you arrange them with their insides down in a large fry pan the carmalization is easily achieved and the bitterness that we all associate with brussel sprouts is replaced by a sweet and lemony taste. The best part is that there is no fat at all in this dish. Enjoy.

Christie's Brussel Sprouts
20-25 brussel sprouts, cut in half, leaves that fall off reserved
1 lemon
1/2 onion
2 cups of water
Salt and pepper

Squeeze lemon juice into pan, place brussel sprouts facing down in one layer. Chop reserved leaves and one brussel sprout roughly, sprinkle these over the brussel sprouts in the pan. Chop the onion and add to the pan. Add salt and pepper. Turn temperature up to high and cook until the brussel sprouts develop a brown colour on their bottoms. Turn down temperature to medium and add 1 cup of water. Reduce until water is no longer remaining, then add the second cup. When all the water has reduced remove brussel sprouts from heat and serve.

Monday, February 9, 2009

Whoopie Pies with Peanut Butter Buttercream Filling


I know you are drooling right now because seriously, these taste even better than they look. These cake like cookies are number 7 of 175 different cookies in my Martha Stewart Cookie Book that I have made. I was going over to Ian's on Saturday to watch the Habs game (Toronto won? Seriously?) and all of his sweaty hockey buddies from the ball hockey game they played earlier were gathered around the TV. I wanted to bring some kind of cookie, so I started to put together a list of ingredients that I knew men loved:
1. Peanut butter
2. Chocolate
3. Peanut butter and Chocolate together

And that is how I picked the whoopie pies for the Saturday night Habs game. I prepared half a batch which made 9 massive cream filled cookies, and boy oh boy did those men love them. I think Ian is now considered the luckiest man alive. Even the bus driver tried to get one off of me when I was heading over there. Listen up women, the way to a man's heart is through cookies. A lesson for us all. Enjoy!

Peanut Butter Whoopie Pies
adapted from Martha Stewart Cookie Book

3 1/4 cups flour
1 1/2 cups unsweetened cocoa powder
1 tbsp baking soda
1 tbsp baking powder
1 tsp salt
2 sticks (1cup) unsalted butter
2 cups sugar
2 large eggs
2 cups butter milk, room temperature
2 tsp vanilla extract

Filling
1 1/3 cup creamy peanut butter
1 cup (2 sticks) unsalted butter
1 1/2 cups confectioners’ sugar
salt

Cookies
Preheat oven to 400 degrees. Sift together flour, salt, cocoa powder, baking soda, and baking powder. Set aside. In the bowl, cream butter and sugar until light and fluffy. Add eggs, buttermilk, and vanilla. Beat until well combined. Slowly add dry ingredients. Mix until combined. Drop 1-1/2 tbsp of batter onto lined baking pans, spacing 2 inches apart. Bake for 9 minutes. Remove to a rack to cool. Repeat with remaining batter. Spread 2 tablespoons of frosting onto half of the cookies. Sandwich together with remaining cookies. Store in an airtight container for up to 3 days.

Filling
Cream peanut butter and butter a bowl. Mix in sugar until combined, then beat mixture on high speed until fluffy and smooth, about 3 minutes. Add salt to taste, if desired. Use immediately.

Sunday, February 8, 2009

Beet and Celery Soup with Carrot Salad - In the Bag


Pretty eh! Today Ian and I decided to join in on a food challenge called In the Bag. The idea is to create a dish using the ingredients "in the bag". It just sounded like so much fun that we couldn’t miss out. The three ingredients this time around were inspired by a detox from Christmas junk food : carrots, beets, and celery.

It was so fun. We made two types of soup, the beet which was sweet, and the celery that was more savory and a little tart. When the two were eaten together they balanced each other out by adding a great depth of flavour. And yes, it was neat eating two toned soup. I felt special.

The carrot salad was simple, with bursts of sweetness from the raisins and a slight taste of cumin. We love this little side salad and used to buy it for something like 2 dollars per 100g, but now I know the recipe. Ha ha, overpriced suckers.

So thanks to Julia for hosting this challenge. Enjoy!

Beet and Celery Soup with Carrot Salad
soup adapted from Ricardo TV series

Beet Side
4 beets, cut in halves
1 onion, chopped
1 garlic clove, chopped
1 tbsp olive oil
2 tbsp cider vinegar
2 cups chicken broth
Salt and pepper

Celery Side
2 1/2 cups chopped celery
1 tbsp olive oil
1 garlic clove, chopped
1/2 cup white wine
2 cups chicken broth
2 cups potatoes peeled, cut in cubes
1/2 tsp Herb de Provence
1/4 cup 10% cream
Salt and Pepper

Carrot Salad
2 cups carrots
1 tbsp white-wine vinegar
pinch of ground cumin
1/4 cup raisins
1 tablespoon olive oil
1/2 cup water
Salt and pepper


Beet Side
Preheat the oven to 375 °F. Put the beets in an aluminum foil and close.
Cook in the oven for about 1 hour and 30 minutes or until tender. Let cool.
In a saucepan, sauté the onion and garlic in oil over medium heat for about 5 minutes. Deglaze with the vinegar. Add the broth and the beets. Bring to a boil and continue to cook for 5 minutes over medium heat. Sprinkle salt and pepper.
Use a mixer to reduce all the ingredients to a smooth and homogenous purée. Put through strainer. Adjust the seasoning. Reserve in a hot area.

Celery Side
In a sauce pan, sauté the celery and garlic in oil over medium heat for about 3 minutes. Deglaze with the wine. Add the broth, potatoes and herbs. Bring to a boil and simmer over medium heat covered until all the vegetables are tender, about 20 minutes. Use a mixer to reduce the soup to a smooth texture. Put through a strainer. Add the cream and adjust the seasoning.

Pour the two soups into bowls at the same time. Serve hot. To facilitate the task of pouring both into bowls at the same time, transfer to measuring cups.

Carrot Salad
Grate or julienne the carrots. In a large skillet over high heat, bring water, wine vinegar, salt, pepper, and cumin to a boil.
Add carrots and raisins. Reduce heat to medium; cook until liquid is gone, 8 to 10 minutes. Mix in the olive oil. Chill then serve.

Saturday, February 7, 2009

Rosti with Eggs and Carrot Sabayon


Oh Wow. Have you ever had one of those meals that are just so good you lick the plate clean? Ian and I met up early to make this one of a kind, lick the plate breakfast.

It started off pretty normal, eggs, Swiss-style potato pancakes, and well, more eggs. But then I put together the double boiler to make this super unusual but delicious sauce called carrot sabayon. It is made like a hollandaise sauce, but you know how there are just a couple recipes out there that never work for you, no matter what you do, and the cat could probably do a better job? Well hollandaise is my all time epic 'fail' dish. Trust me, I have tried a good dozen times but the result is the same, me throwing a hissy fit and some yellowish clear goo all over the kitchen. All things emulsified do not work in my favour.

So you can see why I was a little afraid to make the sauce. The whole point is to sit there and whisk until it becomes thick and creamy, but half way through Ian decided that it was never going to work and stopped whisking, throwing me into a panic. I was determined and therefore, even with his skeptical whispers in my ear, I trudged on. Low and behold, in another 3 minutes we had this wonderfully smooth, light and fluffy carrot sabayon. He says he never doubted it.

The taste of the sabayon on the potato rosti with fried eggs was so gratifying. I thing next time I will just skip the hollandaise sauce all together, and make this.

Rosti with Eggs and Carrot Sabayon
adapted from Ricardo magazine, Holiday 2008

Rosti
5 yellow fleshed potatoes, peeled
2 green onions, finely chopped
1tbsp butter
1tbsp olive oil
Salt and Pepper

Carrot Sabayon
1/2 cup carrot juice
1tbsp lemon juice
3 egg yolks

Fried Eggs
1 tbsp butter
5 eggs
Salt and Pepper

Rosti
Grate potatoes onto a clean tea towel; wring out the liquid by wrapping the potatoes in the towel and twisting it over the sink. In a bowl, combine the potatoes and green onions. Season with salt and pepper. Heat butter and oil in large pan over medium heat. Divide the potato mixture into 3 pancakes per skillet, pressing each pancake lightly together. Fry for 8 min. then carefully flip and fry for another 8 min. Add butter as needed.

Carrot Sabayon
In the top part of a double boiler, off the heat, whisk together carrot juice, lemon juice, and egg yolks. Season with salt and pepper. Place the double boiler over a pot of simmering water and whisk constantly until the sauce is thick and creamy. Cover with plastic wrap. Set over a saucepan of hot (but not boiling) water.

Fried Eggs
Melt the butter in large skillet over medium heat. Fry the egg in the butter until the whites are set, and the yolks warm, about 5 min.

Top each rosti with a fried egg and drizzle with sabayon.

Friday, February 6, 2009

Tortellini en Brodo


It seems that everyone is sick today, including Ian and my roommate, so what better dinner than tortellini en brodo.

Tortellini en brodo is a classic Italian dish, simple and delicious. My mom always made it for me when I was sick, so I have carried on the tradition here in Montreal.

The first time I made this for Ian he kept passing out on the couch from the flu. Regardless of his narcolepsy, he could not get over the fact that I just stuck a whole bird into a pot, added veggies, covered it with water, and an hour later he was eating home made chicken soup. I told him I was a magician.

Making your own broth is really easy and takes little to no effort. That’s not to say that I don’t use store bought stock for every other dish, but there is something so comforting about the smell and taste of home made chicken soup.

The key to good soup is to add a bunch of vegetables and herbs along with the secret ingredient, a turnip, then once it has simmered for a while, strain the soup through a piece of paper towel to get rid of the molten fat.

Let’s just go ahead and say that this soup was invented by the Italians, all those years ago, solely for those pesky sick days. Enjoy.

Tortellini en Brodo
adapted from Tyler Florence

1 whole chicken (about 2 pounds)
2 carrots, cut in large chunks
3 celery stalks, cut in large chunks
1 large white onions, quartered
1 head of garlic, halved
1 turnip, halved
¼ bunch fresh thyme
2 bay leaves
1 tsp whole black peppercorns
Salt to taste
1 package of tortellini

Place the chicken and vegetables in a large stockpot over medium heat. Pour in only enough cold water to cover (about 3 L); too much will make the broth taste weak. Toss in the thyme, bay leaves, and peppercorns, and allow it to slowly come to a boil. Lower the heat to medium-low and gently simmer for 1 to 1½ hours, partially covered, until the chicken is done. As it cooks, skim any impurities that rise to the surface; add a little more water if necessary to keep the chicken covered while simmering.
Carefully remove the chicken to a cutting board. When its cool enough to handle, discard the skin and bones; hand-shred the meat into a storage container.
Carefully strain the stock through a fine sieve lined with paper towel, into another pot to remove the vegetable solids and extra fat.
Bring salted water to a boil in a stock pot. Add tortellini and cook as suggested. Strain and add to soup. Add chicken and Parmesan cheese if you desire.

Thursday, February 5, 2009

Nutella Linzer Cookies


WORLD NUTELLA DAY
WORLD NUTELLA DAY
WORLD NUTELLA DAY
If you really couldn't figure it out, today, Feb 5, is world nutella day. Actually every Feb 5 is nutella day, and bless them for creating such a holiday.

Each nutella holiday, we as happy followers of the nutella religion are supposed to create some sort of dish with the nutty chocolate spread in it. I made cookies, but usually I just eat it off the biggest spoon I can find to commemorate the anniversary.

These cookies were originally raspberry linzer almond cookies, but due to such a joyous holiday, I switched the almonds for hazelnuts, which are the nut element in nutella, and then filled them with as much nutella as I could. When I pushed the two sides of the cookie together glorious nutella squeezed out of the cutout top. They are as good as they sound, trust me.

The people that started this holiday are Ms.Adventures in Italy and Bleeding Espresso. You can see the official site here. Happy Nutella Day!


Nutella Linzer Cookies
adapted from Martha Stewart
makes 2 dozen cookies

2 cups all-purpose flour, plus more for dusting
1/2 tsp baking powder
3/4 cup hazelnuts, toasted
2 tbsp confectioners' sugar, plus more for sprinkling
1/8 tsp salt
1/8 tsp ground cinnamon
1/2 cup (1 stick) unsalted butter
1/4 cup granulated sugar
1 tsp pure vanilla extract
1 large egg
1/2 cup nutella

Sift flour and baking powder into a bowl; set aside. Pulse hazelnuts, confectioners' sugar, salt, and cinnamon in a food processor until finely ground (but not wet); transfer to a bowl. Add butter and granulated sugar; mix until fluffy. Mix in vanilla and egg. Add flour mixture; mix until combined. Halve dough; shape into disks. Wrap in plastic; refrigerate until firm.
Preheat oven to 375 degrees. Working with 1 disk at a time, roll out dough on a lightly floured surface to 1/8 inch thick. Refrigerate 20 minutes. Cut out circles with a 2-inch fluted cutter. Cut out centers of half the circles with a 1/2-inch cutter; reroll scraps. Space 2 inches apart on parchment-lined baking sheets. Bake circles until pale golden, 8 to 10 minutes. Transfer to racks to cool.
Sprinkle cutout cookies with confectioners' sugar. Spread nutella onto uncut squares; top with cutout ones.

Wednesday, February 4, 2009

Very Vanilla Bean Rice Pudding


Some questions to ponder:
Q. What could be better than a warm comforting bowl of rice pudding on this f*%$ing cold day?
A. I'll tell you, nothing.

Q. What’s better than the smell of vanilla and cream cooking on the stove?
A. You guessed it, nothing.

Q. What else could make Christie and Ian catfight over the last spoonful of pudding?
A. Absolutely nothing. (We get along great sans pudding)

Q. What are you going to go make right now?
A. I think I’m psychic, Very Vanilla Rice Pudding, was I right?

It seems that this season rice pudding is the "it" food to eat and blog about. All the foodies out there have made some variation of this pudding at one time or another during this snowy winter. Heck, in this little apartment we have made it five times in the span of three days.

The secret is in the pudding, actually there are three secrets. Of course you can guess, the first is the addition of two types of vanilla, vanilla bean and the extract. If you buy the cheapy vanilla beans that have been soaked in bourbon, you will find yourself getting more bang for your buck. Bourbon, check. Vanilla bean, check. It pays to be cheap.

The second secret is to use Arborio rice. What is that you say? It’s the type of rice used in Italian risottos, so inherently it cooks up plump and creamy.

The third secret is a little out there, are you ready? It’s a bay leaf. Don’t diss it till you try it. I read about using it somewhere down the line and it really works, so lets not mess with a good thing, ok people.

A marvelous little extra to this pudding is that it is made with 1% milk, which makes this dessert low fat, equaling more in my tummy.


Also, because we eat this pudding so often I decided to get myself a pretty bowl specifically to hold the starchy gold. You may find this weird, but in my world food is rewarded for tasting so good (hence my coffee cup that no one else may use). Enjoy!


Very Vanilla Bean Rice Pudding
serves 5, or just 1 if you are like me

1/2 cup Arborio rice
1/4 cup sugar
4 cups 1% milk
1 tsp cinnamon
1/2 tsp vanilla extract
1/2 vanilla bean, split in half
1 bay leaf
1/2 tsp salt

Add all ingredients to a pot, bring to boil, and then turn down to a simmer for 40 min. Stir every 10 minutes so that the rice does not stick to the bottom. When finished; remove bay leaf. Scrape out extra vanilla seeds from bean and stir seeds back into the pudding.

Tuesday, February 3, 2009

GUEST BLOG DAY! Alex's Chocolate Pecan Cookies


Hello there, today Coco Bean has it's first guest blogger. Ian and I are very busy this Tuesday and don't really have the time to cook so Alex has been very kind to share his cookie baking experience. So, without due, here he is...

Alex Goldberg
So I’m supposed to be guest blogging on this strange Coco Bean site. My name’s Alex, and I’ve started to bake cookies like mad, mostly due to Christie’s influence. My latest creations were these pecan chocolate chip cookies, a recipe I can thank Martha Stewart for (Christie always advised me that you can NEVER go wrong with a Martha recipe). I decided to make these because my last batch of cookies, a delicious recipe of white chocolate,dark chocolate, and butterscotch chip mixed with vanilla dough, came out slightly too sugary and overdone. While they looked, in all respects, perfect, their taste was not half of what I was capable of, leaving the horrible taste of failure in my mouth. Such circumstances called for a rebuttal, and I was ready to provide one as soon as possible.

The recipe was a simple one, consisting of mixing lots of creamy butter with a lower than normal amount of sugar, vanilla, egg, and flour. I also made the addition of chopped pecans and chocolate (both dark and white). I had decided that I wouldn’t put the extra whole pecan on top of the cookies, but after much deliberation, I changed my mind and put it on top. Of course, Martha is never wrong, and the extra pecan not only added flavour to the cookie, but also made it look almost professional. And my oh my, these cookies did all but fail! Even prior to tasting, my mouth was watering.

WAIT! While I may have tasted one cookie, I was premature in my assessment of cookie greatness. While the dough is extremely soft and tasty mixed with pecans and chocolate, there are two minor flaws keeping me from cookie perfection:
1. The outside of the cookie is slightly drier than I would have liked and,
2. There are not enough chocolate chips in the dough to make them ultra rich.

Well... this is simply disappointing. I can’t even... no. This is awful. OK, not THAT awful. But it’s not perfect. And that’s unacceptable. If I hadn’t achieved such euphoria watching the Superbowl last night (I’m a rabid Steelers fan since 2004), I’d surely give up on life.


But perhaps I’m being too harsh on myself. The third taste attempt made me realize that they are, indeed, good cookies. And so long as others enjoy eating them, I suppose I should be happy, especially when I can’t possibly eat even more than 4 of any batch of cookies that I bake (my stomach is the size of a peanut).

Soooo.... keep eating, and uhm, if you don’t like them, then file a complaint. Or make your own... but you’ll never make as good a cookie as me or Christie! Well you might... if you do, give them to me, because well, I like cookies.
–the end-

Thanks to Alex for his cookies and writing.


Chocolate Pecan Cookies
adapted from Martha Stewart

1 cup (2 sticks) unsalted butter, room temperature
3/4 cup firmly packed light-brown sugar
1/4 cup granulated sugar
1/4 teaspoon salt
1 teaspoon pure vanilla extract
1 large egg, room temperature
2 cups all-purpose flour
1/2 teaspoon baking soda
12 ounces semisweet chocolate, coarsely chopped
8 ounces pecans, chopped (2 cups)
6 ounces white chocolate, coarsely chopped
30 perfect pecan halves

Preheat oven to 375 degrees, with two racks centered. Line two baking sheets with Silpat non-stick baking mats or parchment paper.
In bowl, cream butter and both sugars until light and fluffy, about 4 minutes. Add salt and vanilla, and mix to combine. Add egg, and continue beating until well combined.
In a medium bowl, whisk together flour and baking soda. Slowly add dry ingredients to butter mixture. Mix until just combined. Stir in chopped pecans and chocolate.
Using a tablespoon, scoop out dough, and place about six balls on each baking sheet, about 3 inches apart. Flatten each ball slightly, and gently press a pecan half in the center.
Bake 7 minutes, rotate pans between oven shelves, and bake until just brown around the edges, 6 to 8 minutes more. Remove from oven, and let cool slightly before removing cookies from baking sheets to cool on wire racks. Repeat process with remaining dough.

Monday, February 2, 2009

Banana-Walnut Chocolate-Chunk Cookies


Nom nom nom.... nom nom nom.... nom nom.... ohh.. Excuse me; I will put the plate of cookies down... for now. Yes, they are that good, and I got them to taste that good on the first try. Thank you very much, I know, I am a cookie star.

OK, so I didn't come up with the recipe, nor did I test it a million times to create that perfect soft, chewy, nutty, chocolaty-banana texture and taste that is so irresistible. It was Martha, all Martha and her housewife army, I admit it. But just think; now you too can have this little taste of heaven, without the fuss.

I finally caved in on Saturday and found myself in Chapters, huddled on the floor of the baking section, completely enthralled with the new Martha Stewart "Cookies" book. Even though Martha has a 'Cookie of the Day' on her website, I still had to have this book. Each recipe has a full page glossy photo of the cookie, delicious looking enough that I am constantly tempted to lick the page. And now it is mine, all mine! (Insert evil laugh.) But you don't have to go out and buy it, because I will be posting all of them on this very blog over the span of however long it takes me to make 175 types of cookies( along with gaining about 30 pounds in butter weight).

So I’m ask you to just think about making these, you could soon be eating a cookie that tastes like banana bread dotted liberally with dark chocolate chunks and crunchy walnut pieces all rolled up into a tiny bite sized treat. OK, I am now going back to my plate of cookies, or what is left of it. Enjoy!


Banana-Walnut Chocolate-Chunk Cookies
adapted from Martha Stewart "Cookies"

Makes 3 Dozen
1 cup all-purpose flour
1/2 cup whole-wheat flour
1 tsp coarse salt
1/2 tsp baking soda
3/4 cup (1 1/2 sticks) unsalted butter, softened
1/2 cup granulated sugar
1/2 cup packed light-brown sugar
1 large egg
1 1/2 tsp pure vanilla extract
1/2 cup mashed, very ripe banana (about 1 large)
1 cup old-fashioned rolled oats
8 oz. (1 cup) semisweet chocolate chunks
1/2 cup coarsely chopped walnuts, toasted

Preheat oven to 375 degrees. Whisk together flours, salt, and baking soda in a small bowl; set aside. Put butter and sugars into a bowl; mix with whisk until pale and fluffy. Add egg and vanilla; mix until combined. Mix in banana. Add flour mixture; mix until just combined. Stir in oats, chocolate chunks, and walnuts.
I like bitesized cookies so this is how I made them: Roll dough with hands untill just smaller than a golf ball, place onto baking sheets lined with parchment paper, spacing about 2 inches apart. Bake cookies until golden brown and just set, 10-12 minutes. Cookies can be stored in airtight containers up to 2 days.

Sunday, February 1, 2009

Asian-style baked drumsticks with dill side dressing, crispy oven fries, and a carrot-celery slaw with toasted garlic and lemon dressing


Wheeeeeeeeeww, now that was a long name! But in all seriousness, this was so worthy of its long winded title.

Now, for my birthday my loving mother just knew that I would be dying for the new Anthony Sedlak cookbook, "The Main". If you haven't seen BC's newest heartthrob on the Canadian Food Network then let me tell you, you are definitely missing out. So here we are, making our way slowly through each main he has in the book, word for word, or should I say ingredient for ingredient, but it seems that Ian and I have become stuck on this one recipe.

The book originally calls for chicken wings instead of drumsticks and blue cheese instead of dill dressing, but the first time we made this recipe it was good, but not great. And so over the past months we had set out to perfect this chicken dish, and hit the jackpot on the second try. Now it is just too good to pass up and every time we get out "The Main" to try a new recipe we end up drooling on page 31 and head to the store in search of drumsticks and dill (you can tell that we like it because the pages are stuck together and splattered with all types of sauce and food.).

Oddly enough the dinky little coleslaw brings the whole meal together. I don't know how and really, I don't care. I'm sure that is what Mr.Sedlak and his lackeys are paid for, not me.
I would like to say one thing though, if you don't have something to julienne the celery, then do not, I repeat, do not attempt the slaw. I personally do not own one and I don't know why, but every time I actually attempt this grueling task and sit for almost an hour cutting teeny tiny little match sticks, by the end I'm often convinced that I should just check myself into the insane asylum and save myself the trouble. Enjoy!

Baked Asian Spiced Chicken Drumsticks
adapted from "The Main" Anthony Sedlak

3/4 cup soy sauce
1/4 cup oyster sauce
1/4 cup chopped cilantro stems
1 x bunch green onion, coarsely chopped
4 x cloves garlic, peeled and finely chopped
2 tbsp hot sauce
2 tbsp sesame oil
1 x 1 1/2 inch piece fresh ginger, peeled and coarsely chopped
10-12 chicken drumsticks
2 tbsp sesame seeds, toasted

Carrot Celery Slaw
4 x celery stalks, julienned
1 x large carrot, julienned
3 tbsp vegetable oil
2 x cloves garlic, peeled and finely chopped
juice of 1 lemon
salt and pepper

Baked French Fries
8 russet potatoes
3 tbsp vegetable oil
salt, pepper, and Italian spices

Dill Dressing
1/2 cup mayonnaise
1/2 cup low fat sour cream
1/2 tbsp dried parsley
1 tbsp grated onion
4 tbsp fresh dill weed
salt and pepper to taste

Baked Asian Spiced Chicken Drumsticks
In a large bowl mix soy sauce, oyster sauce, cilantro stems, green onion, garlic, ginger, hot sauce, and sesame oil. Add chicken and marinate 20 minutes - up to overnight.
Preheat oven to 450 F. Transfer chicken wings to a large ovenproof dish. Pour extra marinade over wings. Place in preheated oven and bake for 20 minutes. Reduce oven temperature to 350F and bake another 40-45 minutes.
Sprinkle with sesame seeds.

Carrot Celery Slaw
In a medium bowl, mix celery and carrot to combine.
In a small skillet, heat vegetable oil over medium heat. Add garlic and sauté for 2-3 minutes, or until golden brown. Remove from heat and add oil to celery and carrot.
Add lemon juice and toss to combine.
Season with salt and pepper

Baked French Fries
Wash potatoes with skin on. Cut potatoes into any sized fries you would like. Place in cold water for 20min. then pat dry with a towel. Toss with oil and spices then spread out on baking sheet and bake at 375F for 40 min. Flip fries half way through.

Dill Dressing
In a medium bowl combine the mayonnaise, sour cream, parsley, onion, dill weed, and salt. Mix all together, cover, and refrigerate.